Develop: Customer Orders
Estimated reading time: 14 minutesOverview
In this example, you will create a second report, Customer Orders, that can be drilled to from the Customer Aging Report you built in the last example. (To learn how to set up a drill, see Drilling Between Reports.)
Verifying the Data Connection
Because this report uses the same database as the previous example, you do not need to create another data connection. The same connection can be used for this report. The connection created there was named NorthwindExampleDB_MyName ("MyName" is replaced with your name).
Copy the Data Portal
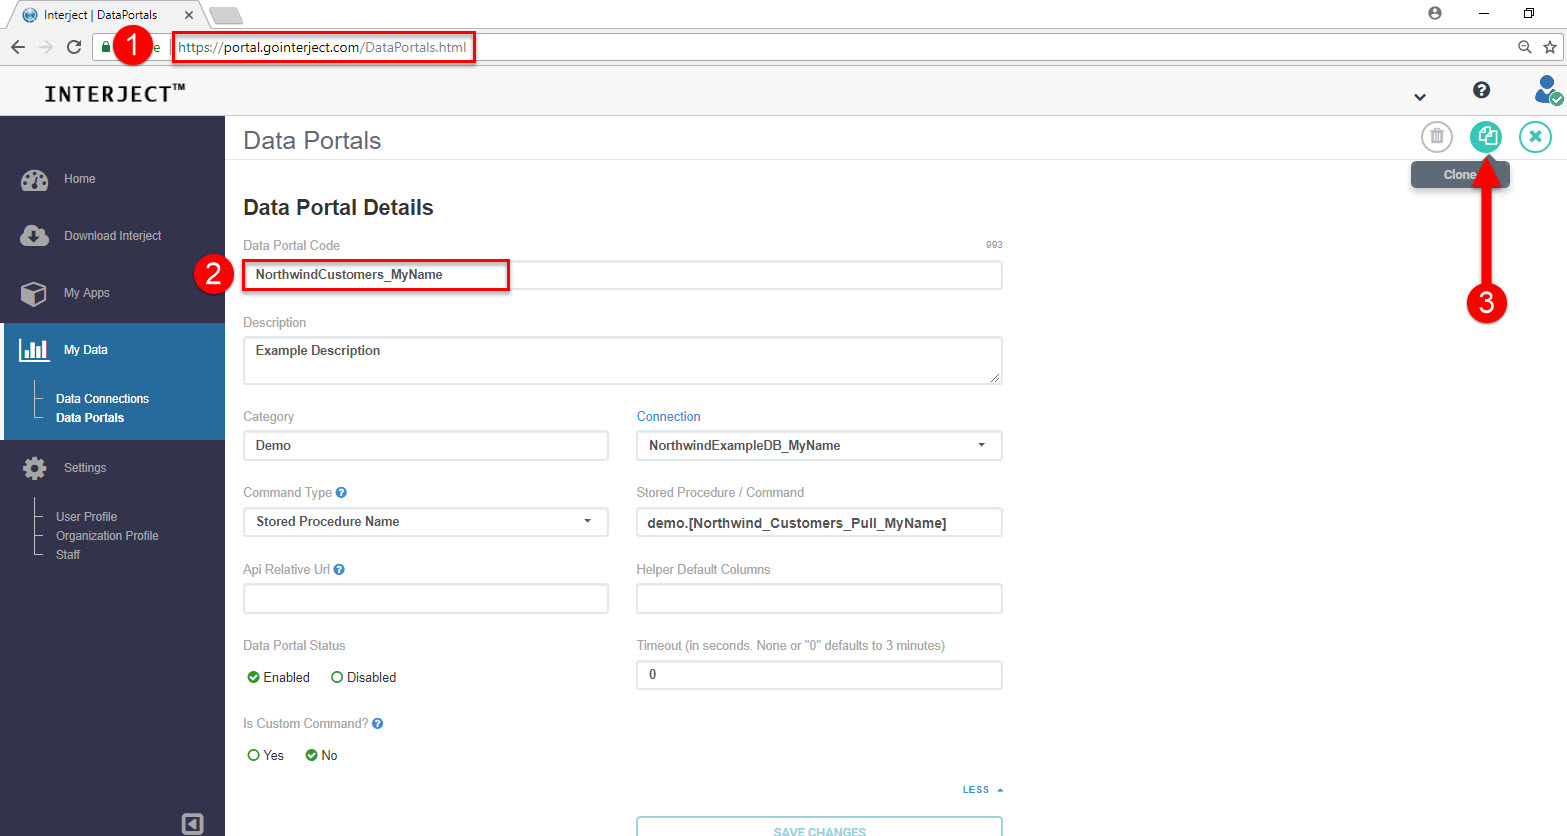
Step 1: Navigate to the data portal you set up in the previous report on the Portal Site. Click the green Clone button on the top right corner of the page.
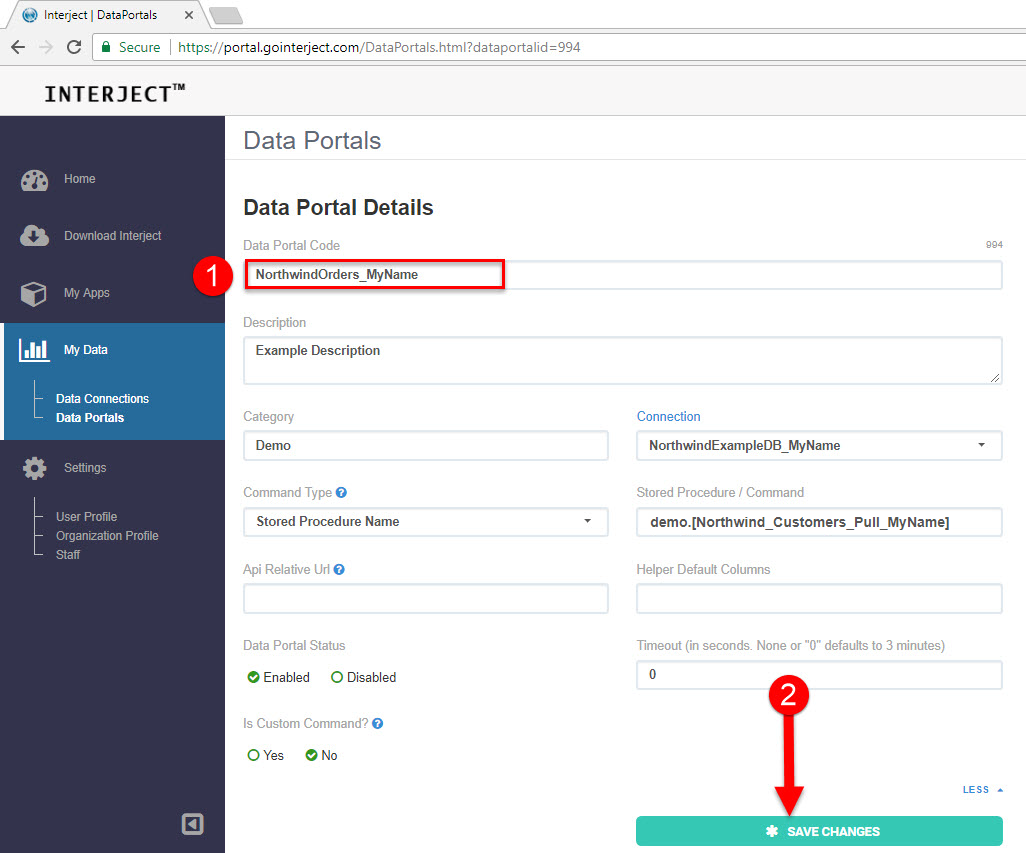
Step 2: A new data portal named, NorthwindCustomers_MyName_copy, generates. Change this data portal name to NorthwindOrders_MyName. Since each Data Portal must have a unique code, please use your name instead of "MyName". Then click Save Changes.
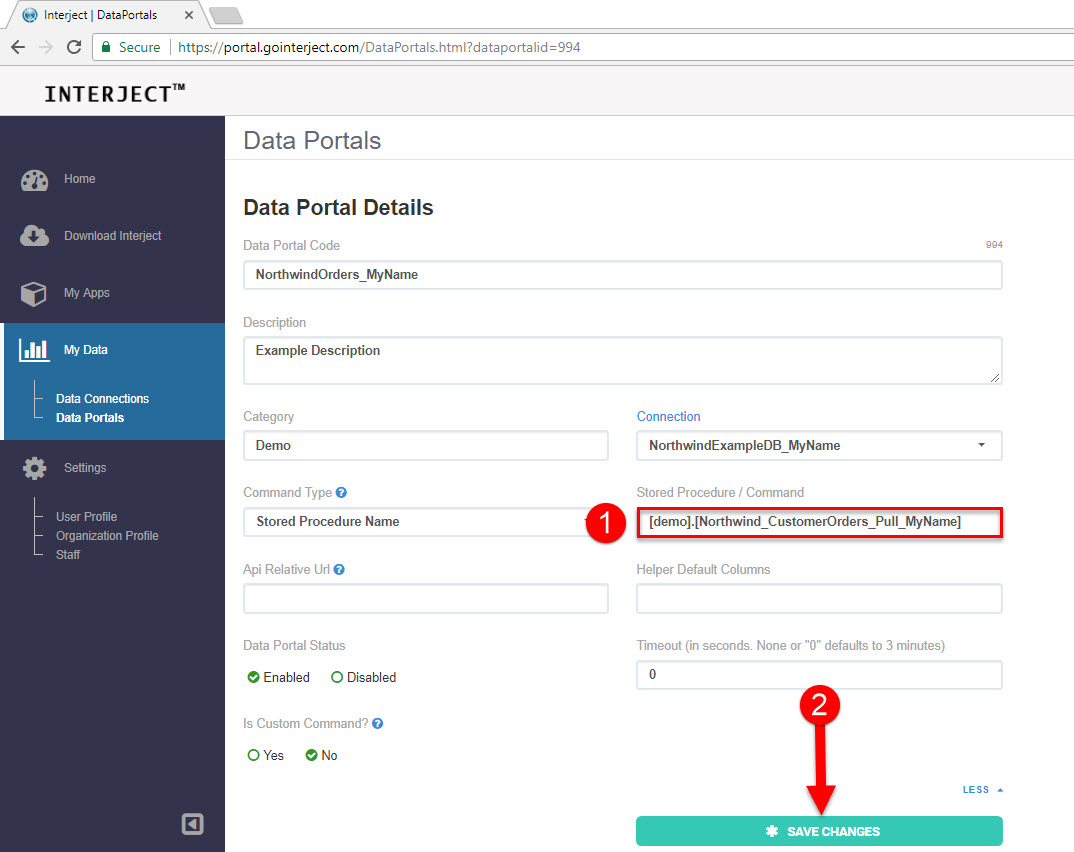
Step 3: Change the procedure name to [Demo].[Northwind_CustomerOrders_Pull_MyName] (again sub "MyName" with your name). You will set up this procedure next. Then click Save Changes.
Creating the Stored Procedure
A stored procedure or data API serves as a middle tier for an Interject report. In this example you will be using a stored procedure. Interject can retrieve one or more result sets from a stored procedure into the spreadsheet report.
The Interject Website Portal allows you to create and manage Data Portals and reference stored procedures you create. Data Portals are stored locally in your Excel session when you log into Interject. When requesting data Interject creates a point-to-point connection with the intended data source.
The below steps assume you are proficient with SQL Management Studio for Microsoft SQL Server and in creating stored procedures. If you need additional training in this area, please contact us at info@gointerject.com.
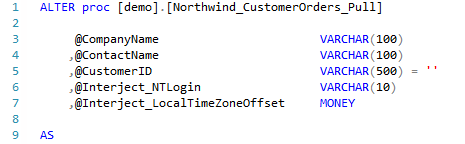
Step 1: Create a stored procedure called [demo].[Northwind_CustomerOrders_Pull_MyName] using the following code example (replace "MyName" with your name):
CREATE PROC [demo].[Northwind_CustomerOrders_Pull_MyName]
@CompanyName VARCHAR(100)
,@ContactName VARCHAR(100)
,@CustomerID VARCHAR(500) = ''
,@Interject_NTLogin VARCHAR(10)
,@Interject_LocalTimeZoneOffset MONEY
AS
BEGIN
SET NOCOUNT ON -- helps reduce conflicts with ADO
DECLARE @ErrorMessage VARCHAR(100)
IF LEN(@CompanyName)>40
BEGIN
SET @ErrorMessage = 'Usernotice:The company search text must not be more than 40 characters.'
RAISERROR (@ErrorMessage, 18, 1)
RETURN
END
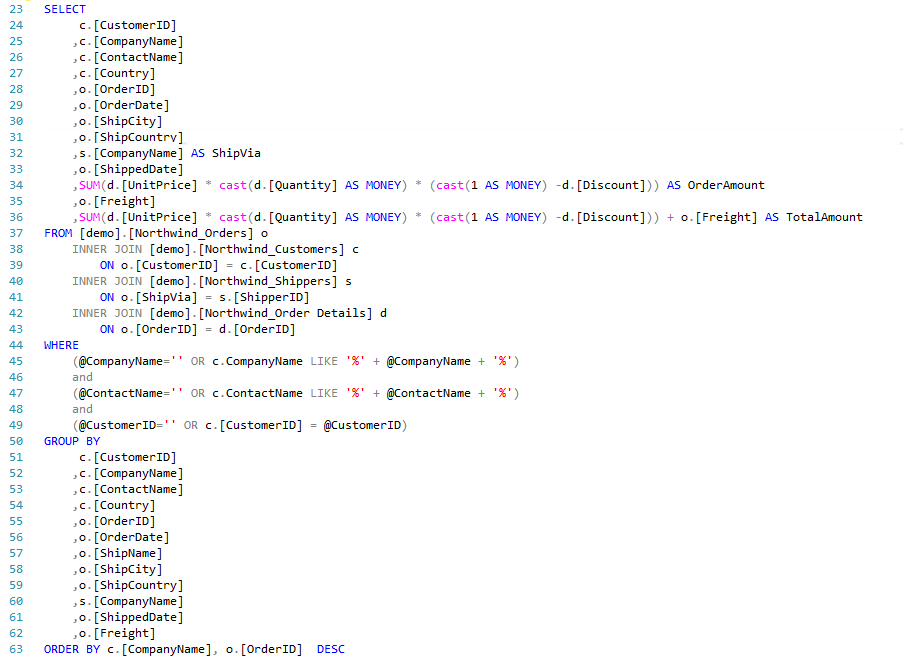
SELECT
c.[CustomerID]
,c.[CompanyName]
,c.[ContactName]
,c.[Country]
,o.[OrderID]
,o.[OrderDate]
,o.[ShipCity]
,o.[ShipCountry]
,s.[CompanyName] AS ShipVia
,o.[ShippedDate]
,SUM(d.[UnitPrice] * cast(d.[Quantity] AS MONEY) * (cast(1 AS MONEY) -d.[Discount])) AS OrderAmount
,o.[Freight]
,SUM(d.[UnitPrice] * cast(d.[Quantity] AS MONEY) * (cast(1 AS MONEY) -d.[Discount])) + o.[Freight] AS TotalAmount
FROM [demo].[Northwind_Orders] o
INNER JOIN [demo].[Northwind_Customers] c
ON o.[CustomerID] = c.[CustomerID]
INNER JOIN [demo].[Northwind_Shippers] s
ON o.[ShipVia] = s.[ShipperID]
INNER JOIN [demo].[Northwind_Order Details] d
ON o.[OrderID] = d.[OrderID]
WHERE
(@CompanyName='' OR c.CompanyName LIKE '%' + @CompanyName + '%')
and
(@ContactName='' OR c.ContactName LIKE '%' + @ContactName + '%')
and
(@CustomerID='' OR c.[CustomerID] = @CustomerID)
GROUP BY
c.[CustomerID]
,c.[CompanyName]
,c.[ContactName]
,c.[Country]
,o.[OrderID]
,o.[OrderDate]
,o.[ShipName]
,o.[ShipCity]
,o.[ShipCountry]
,s.[CompanyName]
,o.[ShippedDate]
,o.[Freight]
ORDER BY c.[CompanyName], o.[OrderID] DESC
END
Step 2: Stored procedures are natively supported by Interject. There are a few key areas to note in the code example that help illustrate Interject features.
- Parameters: The parameters included in the stored procedure are the same that were added to the Data Portal in the previous steps. On each request, Interject passes the Formula Parameters values from the spreadsheet configuration along with System Parameters to the stored procedure. Output parameters are supported which can populate values in the spreadsheet but they are not included in this example.
- Validation: The example code includes an example of validating the input for the @CompanyName parameter. It limits the search text to 40 characters and will raise an error if the length is beyond. The custom error shown has a prefix Usernotice:,which is a keyword that tells Interject to provide a message box with the text to the user as a response. Without this prefix, Interject will interpret the error as a generic error.

- Select Statements: Returning data to Interject simply uses a select statement as shown below. More than one can be returned at a time to reduce the connections needed to fully populate a complex report. You only have one select statement in this example.
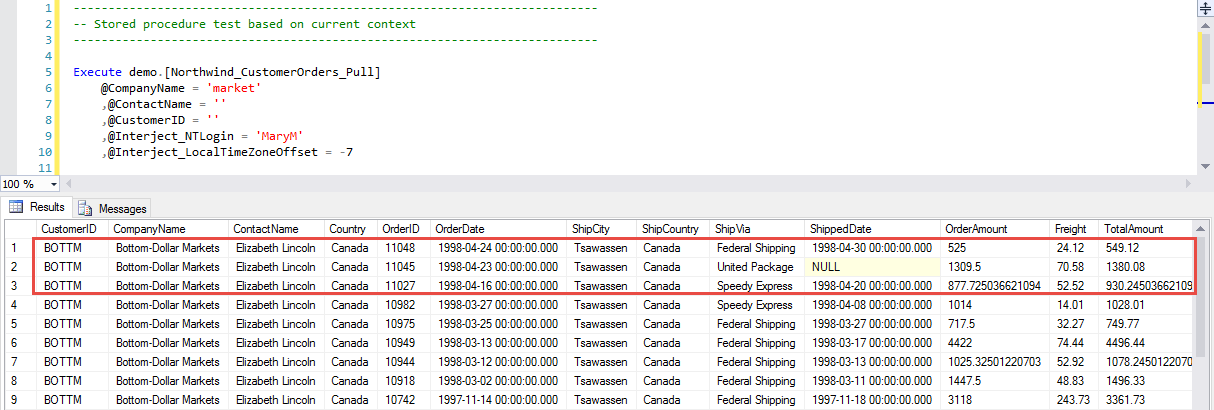
Step 3: It is important to test the stored procedure in the database before testing through the Interject platform. The following example code is an SQL statement that can be executed in a new query. Be sure to change the procedure name to match your own.
 Execute [demo].[Northwind_CustomerOrders_Pull_MyName]
 	@CompanyName = 'market'
 	,@ContactName = ''
 	,@CustomerID = ''
 	,@Interject_NTLogin = 'MaryM'
 	,@Interject_LocalTimeZoneOffset = -7
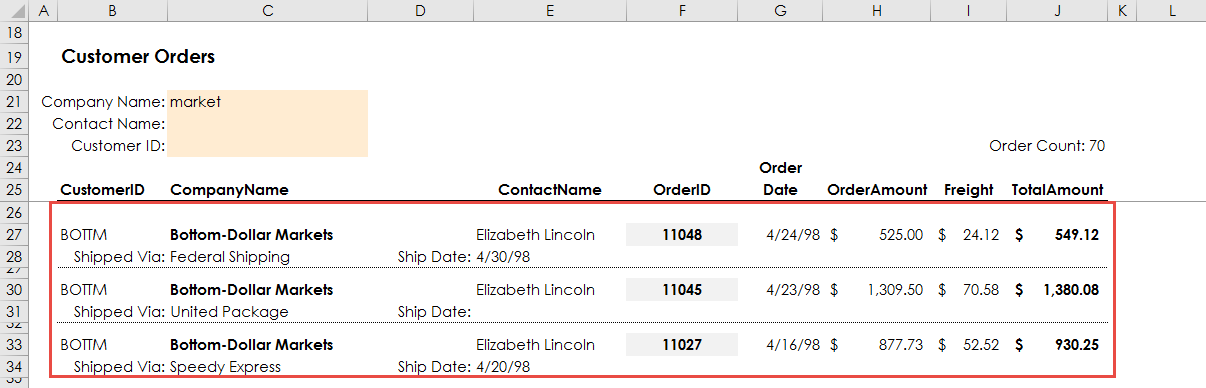
When executed you should see the following result set.
Create the Report
At this point you have a tested stored procedure that uses parameters to filter the results. An Interject Data Connection has been set up to go to your example database and you added an Interject Data Portal to use that connection. In addition, this Portal is mapped to the stored procedure that was just created. Now you are ready to build the spreadsheet report.
Fortunately, the documentation to build this report has already been presented in Create: Customer Orders Report and you likely have already completed it. However, it is recommended to refamiliarize yourself with setting up this report again to reinforce the process. Just be sure to use your own Data Portal that you just set up for the report.
The end result should look like the screenshot below.