Manual Setup for the Lab Guide
Estimated reading time: 16 minutesOverview
The Lab Guide provides a convenient way for users to become familiar with Interject. The Guide has several individual walkthroughs on how to create reports, modify reports, drill to data, and export reports. For those who want greater control and flexibility in making modifications to the Lab Guide, this page details how to setup the environment manually.
Interject Data Report Flow
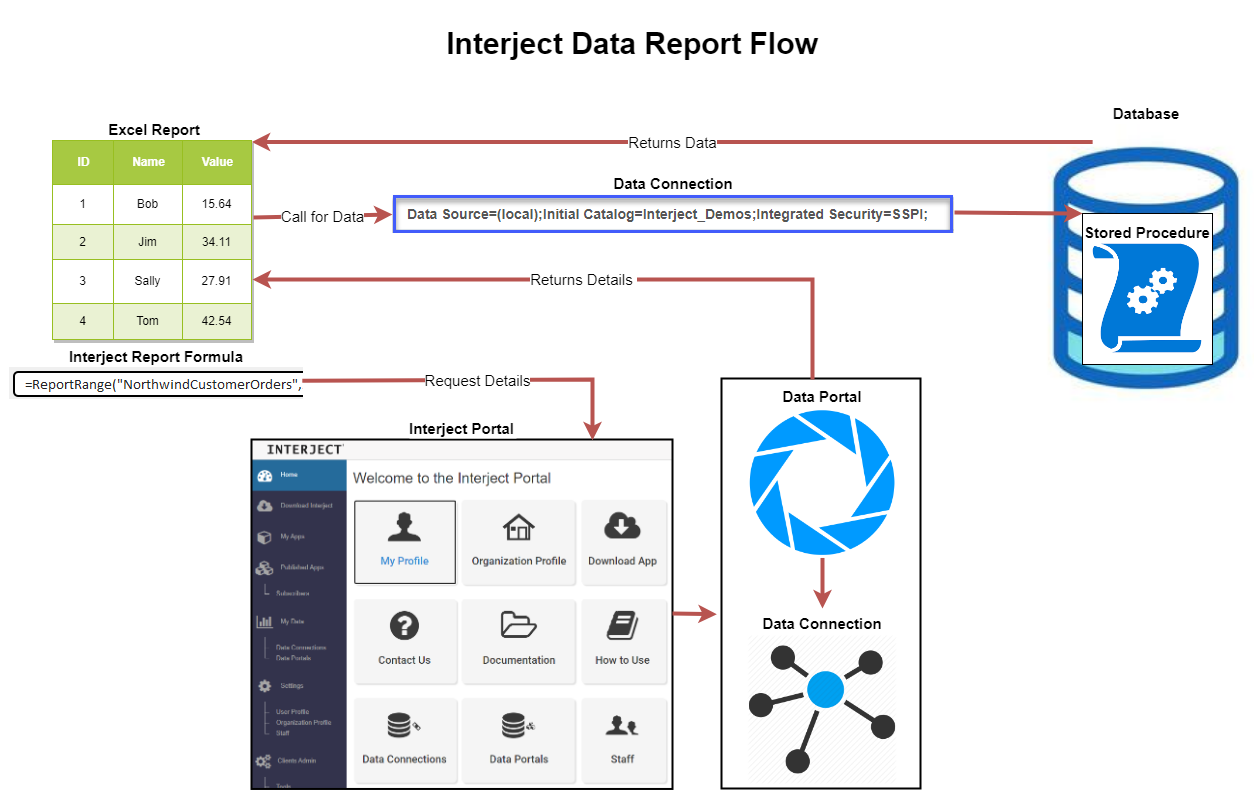
The reports in the Lab Guide contain Interject report formulas, each referencing a Data Portal setup on the Interject Portal Website. These Data Portals in turn reference a Data Connection and a Stored Procedure that point to a data source where the data will be pulled from. When the data source is a database, the entire flow can be conceptualized by the following diagram:
Manual Setup
There are a number of steps necessary for manual setup:
- Step 1: Download the database and install locally
- Step 2: Set up the Data Connections on the Interject Portal site
- Step 3: Set up the Data Portals on the Interject Portal site
- Step 4: Set up the FinCube Portals
- Step 5: Download the lab files
- Step 6: Change the Data Portal names in the files to match the ones manually set up
The following walks through the steps to set up a Lab environment locally.
Step 1: Setting up the Database
The first step in manually setting up a Lab environment is to establish a database on a local system where the Lab Guide will be used. Interject's choice of database is SQL Server as the Lab Guide relies on Microsoft's Northwind Database.
The following is a minimalist script to recreate the database using SQL Server 2014 or greater:
labs_db_script_sql_server_2014.sql
This script will have all the necessary tables, functions, procedures, schemas, and roles. You will need to first create the database of your choosing and then run this script inside that database. You may use SSMS or another editor of your choice.
Step 2: Setting up the Data Connection
Navigate to the Interject Portal site and log in. For a guide about how to use the Interject Portal site, see here.
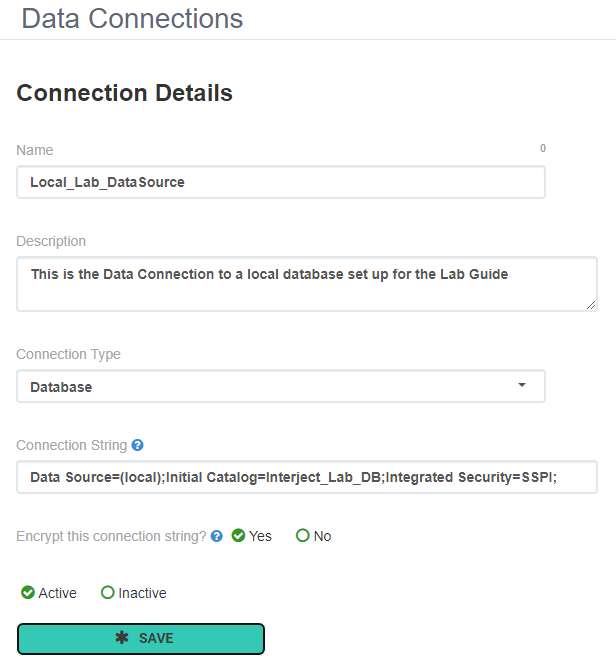
Set up a Data Connection that points to the database you set up. The following example uses a database called "Interject_Lab_DB":
- Name: Local_Lab_DataSource
- Description: This is the Data Connection to a local database set up for the Lab Guide
- Connection Type: Database
- Connection String: Data Source=(local);Initial Catalog=Interject_Lab_DB;Integrated Security=SSPI;
For detailed instructions on how to set up a Data Connection, see Portal: Database Connection.
Step 3: Setting up the Data Portals
Now that you have a database and set up a Data Connection to it, you need to start adding Data Portals. For instructions on how to set up Data Portals, see Data Portals. Following is a list of the Data Portals and their Stored Procedures used in the Labs.
Note: The Data Type and Direction are automatically set when selecting a System Parameter.
| Parameter | Parameter Type | Data Type | Direction |
| Interject_RequestContext | System Parameter | ||
| Interject_ReturnError | System Parameter |
| Parameter | Parameter Type | Data Type | Direction |
| CompanyName | Formula Parameter | nvarchar | input |
| ContactName | Formula Parameter | varchar | input |
| CustomerID | Formula Parameter | varchar | input |
| UnappliedOnly | Formula Parameter | varchar | input |
| BeginDate | Formula Parameter | varchar | input |
| EndDate | Formula Parameter | varchar | input |
| Interject_ReturnError | System Parameter | ||
| Interject_RequestContext | System Parameter |
| Parameter | Parameter Type | Data Type | Direction |
| CompanyName | Formula Parameter | nvarchar | input |
| ContactName | Formula Parameter | varchar | input |
| CustomerID | Formula Parameter | varchar | input |
| ShowExpectedDate | Formula Parameter | varchar | input |
| IncludePaid | Formula Parameter | varchar | input |
| Interject_RequestContext | System Parameter |
| Parameter | Parameter Type | Data Type | Direction |
| OrderID | Formula Parameter | int | input |
| CustomerID | Formula Parameter | nvarchar | output |
| ContactName | Formula Parameter | nvarchar | output |
| CompanyName | Formula Parameter | nvarchar | output |
| ShipAddress | Formula Parameter | nvarchar | output |
| ShipCity | Formula Parameter | nvarchar | output |
| ShipPostalCode | Formula Parameter | nvarchar | output |
| ShipCountry | Formula Parameter | nvarchar | output |
| Phone | Formula Parameter | nvarchar | output |
| Fax | Formula Parameter | nvarchar | output |
| OrderDate | Formula Parameter | date | output |
| RequiredDate | Formula Parameter | date | output |
| ShippedDate | Formula Parameter | date | output |
| ShipVia | Formula Parameter | nvarchar | output |
| Freight | Formula Parameter | money | output |
| Interject_RequestContext | System Parameter | ||
| Interject_ReturnError | System Parameter |
| Parameter | Parameter Type | Data Type | Direction |
| CompanyName | Formula Parameter | nvarchar | input |
| ContactName | Formula Parameter | varchar | input |
| CustomerID | Formula Parameter | varchar | input |
| Interject_NTLogin | System Parameter | ||
| Interject_LocalTimeZoneOffset | System Parameter |
| Parameter | Parameter Type | Data Type | Direction |
| Interject_NTLogin | System Parameter | ||
| Interject_ReturnError | System Parameter |
| Parameter | Parameter Type | Data Type | Direction |
| Interject_ReturnError | System Parameter | ||
| Interject_RequestContext | System Parameter |
| Parameter | Parameter Type | Data Type | Direction |
| UnitsInStockMin | Formula Parameter | varchar | input |
| Category | Formula Parameter | varchar | input |
| Interject_NTLogin | System Parameter | ||
| Interject_ReturnError | System Parameter |
Step 4: Setting up FinCube
FinCube is a special Data Portal that is used for financial reporting. This Portal is called "Demo_Interject_FinCube" in the Lab files and is used in 6 labs:
- Lab 1.3 Financial Report
- Lab 2.4 Financial Report
- Lab 4.3 Financial Report
- Lab 5.5 Using the Retain Feature
- Lab 7.2 Basic Distribution
- Lab 7.3 Advanced Distribution
Due to the complexities of this Data Portal, it is advised to use the API connection for this Data Portal. The following steps through how to set up this Portal.
Setting up the FinCube Data Connection
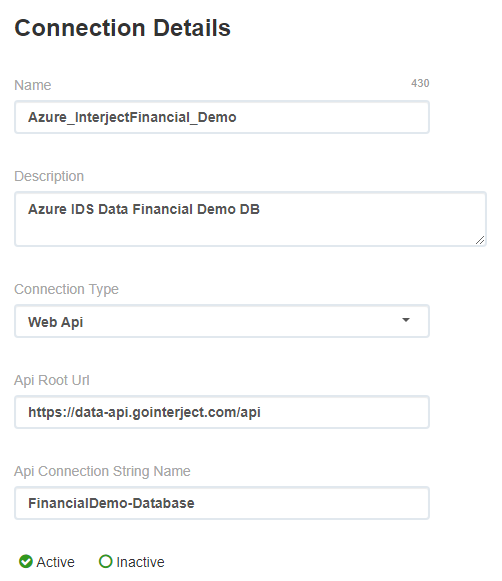
The FinCube Portal can use an API connection. You can use the following settings to set up the Data Connection:
- Name: <Your own custom Name>
- Description: <Your own custom Description>
- Connection Type: Web Api
- Api Root Url: https://data-api.gointerject.com/api
- Api Connection String Name: FinancialDemo-Database
Setting up the FinCube Data Portal
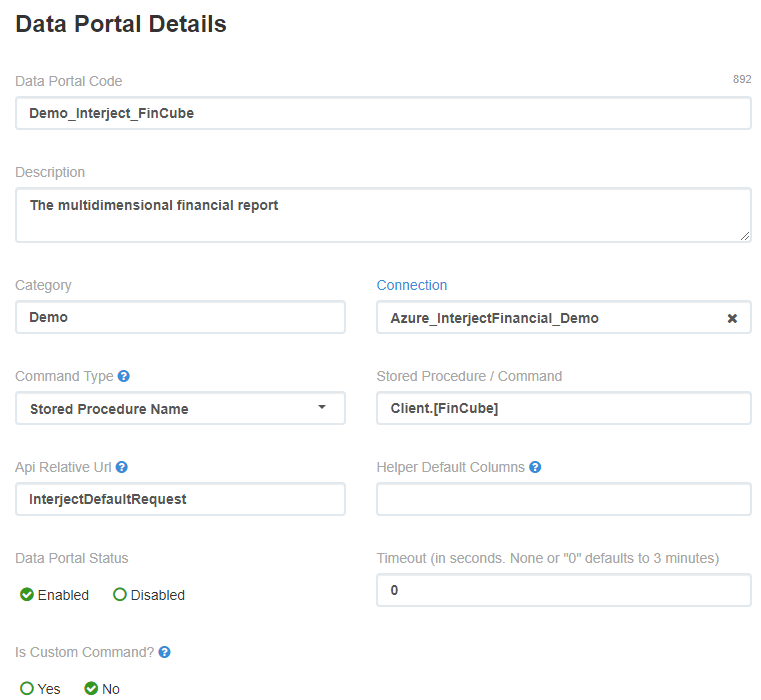
You can use the following settings for the FinCube Data Portal:
- Name: <Your own custom Name>
- Description: <Your own custom Description>
- Connection: <Use the name of the Data Connection you set up in the last section>
- Command Type: Stored Procedure Name
- Stored Procedure/Command: Client.[FinCube]
- Api Relative Url: InterjectDefaultRequest
Setting up the FinCube Data Cells Data Portals
Data Cells are a special type of cell that can directly pull data into the cell using the Data Cell Functions. Data Cells are used in Lab 7.1 Quick Export and PDF. In order for the Data Cells to work, there must be some Data Portals set up. All these Data Portals will use the FinCube Data Connection set up previously.
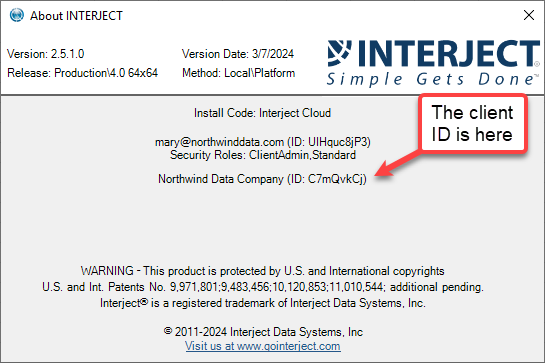
The FinCube Data Portals must be set up for your particular Client profile. Therefore you will need your ClientID. This can be found by clicking About Interject on the Interject ribbon:
Following are the Data Portals that must be set up.
Note: There are no parameters in the FinCube Portals.
| Data Portal | Description | Connection | Command Type | Stored Procedure/Command | Api Relative Url |
|---|---|---|---|---|---|
| UpdateCellDataStatus_<ClientID>* | For Data Cells Update | <FinCube Data Connection> | Stored Procedure Name | [Client].[RequestStatus] | InterjectDefaultRequest |
| UpdateCellData_<ClientID> | For Data Cells | <FinCube Data Connection> | Stored Procedure Name | [Client].[Request] | InterjectDefaultRequest |
| ImportScheduler_<ClientID> | For Scheduler | <FinCube Data Connection> | Stored Procedure Name | [Client].[ImportScheduler] | InterjectDefaultRequest |
| SegmentData_<ClientID> | For Data Cells | <FinCube Data Connection> | Stored Procedure Name | [Client].[Segment} | InterjectDefaultRequest |
* Use your ClientID here
Step 5: The Report Files
The following zip file contains all the necessary files for the Lab Guide:
Note: Some labs do not have a lab file as they either start with a blank Excel file or are continued from a previous lab. The following labs do not have a file: 3.1, 3.2, 3.3, 3.6, and 7.3.
Step 6: Renaming the Data Portals
Once you have created the Data Portals with your own custom names, you will have to change the name of the Data Portals in the Report formulas found in the Lab files. To help with this, the following is a list of all the labs along with their associated file and every Data Portal used in those files: