Develop: Customer Aging Detail
Estimated reading time: 37 minutesOverview
In this example, you will learn to create a third report, Customer Aging Detail, that will be drilled to from the Customer Aging Report. This report shows a customer's outstanding balance by individual invoice. The Aging Detail is a more complex report than shown in the earlier example Develop: Customer Orders, because it leverages two report formulas to create a report with subtotals. You should have already seen the Customer Aging Detail report while reviewing the business use case in the Customer Aging in Real-World Walkthroughs.
Verifying the Data Connection
Because this report uses the same database as Develop: Customer Aging Detail, you do not need to create another data connection. The same connection can be used for this report. The connection created in the previous example was named NorthwindExampleDB_MyName and your own data connection likely had your name in the suffix.
Copying and Modifying the Data Portals
For this report you are going to use two data portals. The first will be the same data portal used in a previous example called NorthwindCustomers_MyName. You created your own with your name in the suffix. The below steps will create a copy of this data portal for the customer invoice detail since it saves a little time.
Step 1: Navigate to the data portal, NorthwindCustomers_MyName, and click the green clone button on the top right of the page.
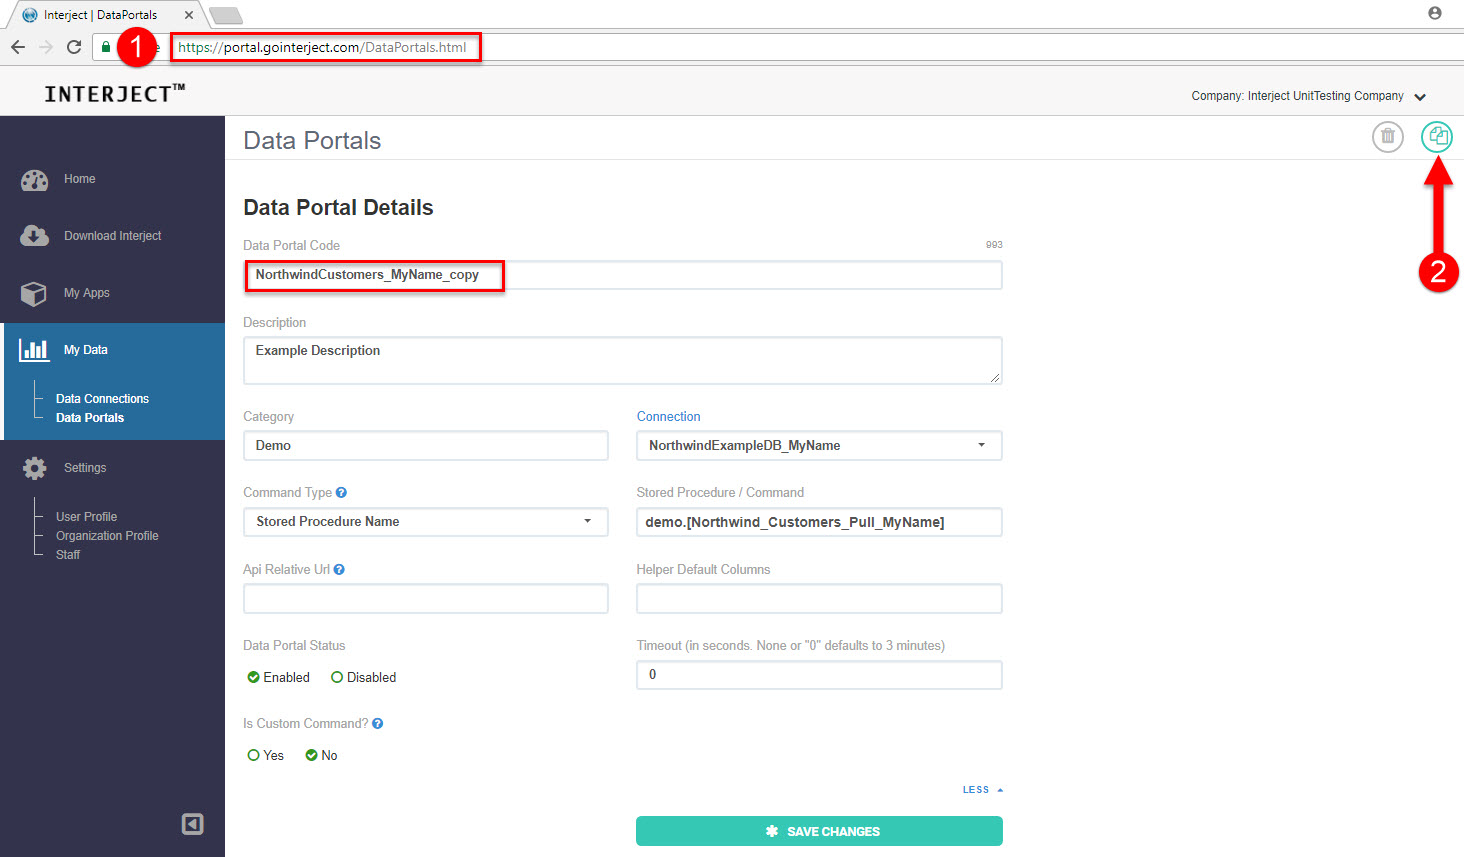
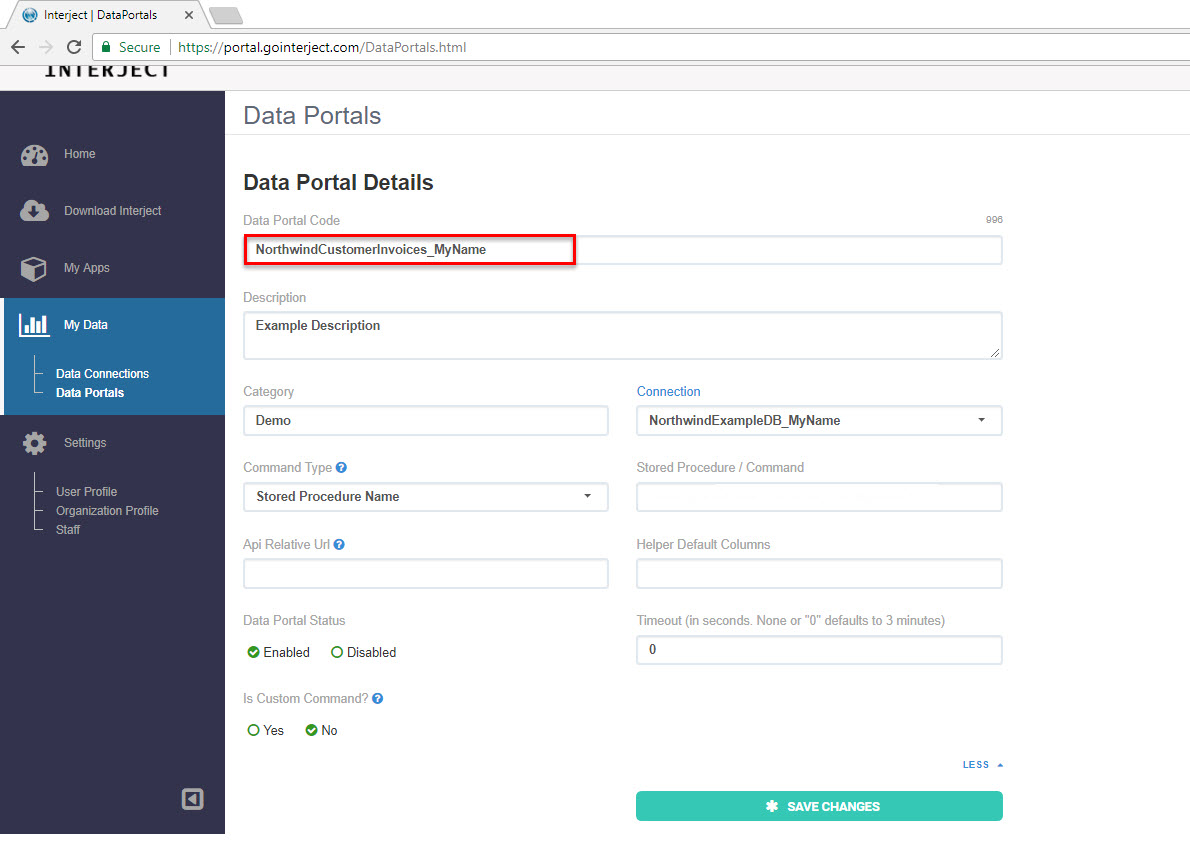
Step 2: A new data portal named, NorthwindCustomers_MyName_copy, generates. Change this data portal name to NorthwindCustomerInvoices_MyName. Since each Data Portal Code must be unique, you should add your name to the suffix.
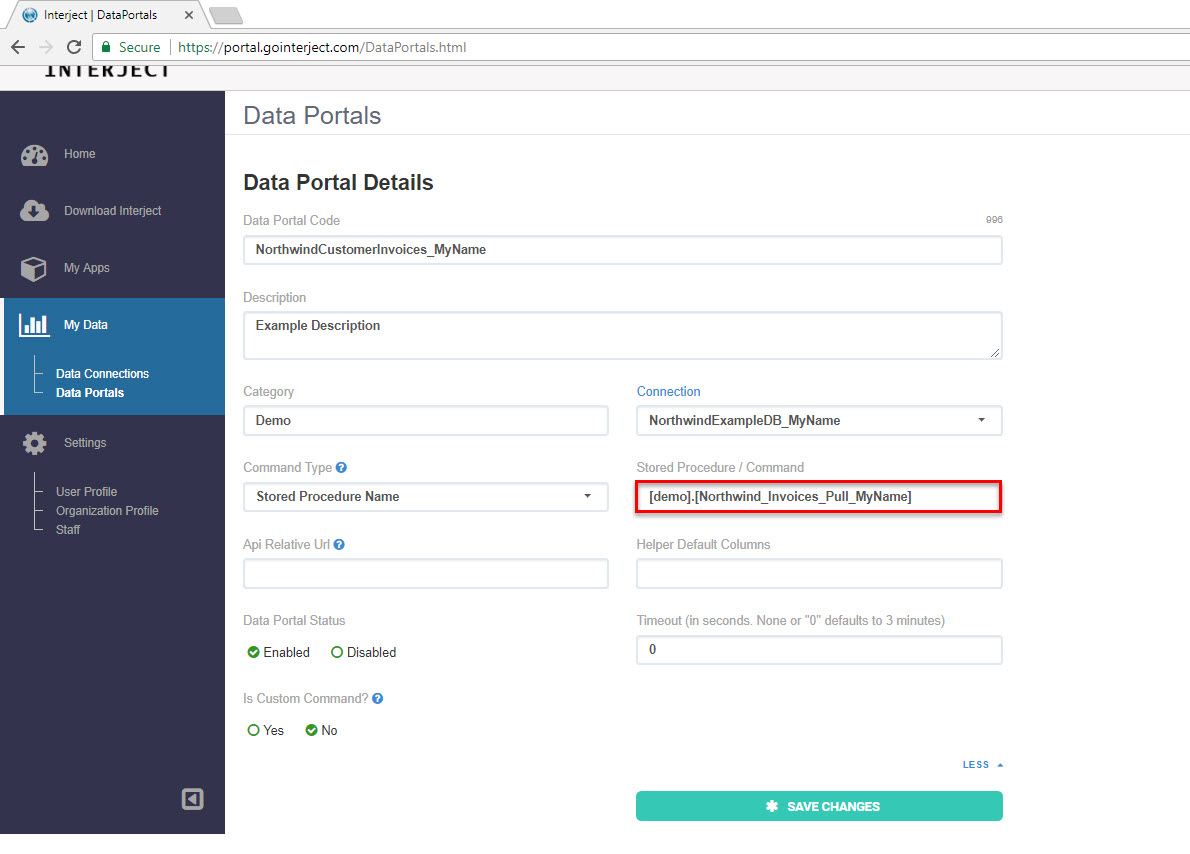
Step 3: Change the procedure name to run [demo].[Northwind_Invoices_Pull_MyName], which you will create shortly. As in the last step, replace _MyName with your own name.
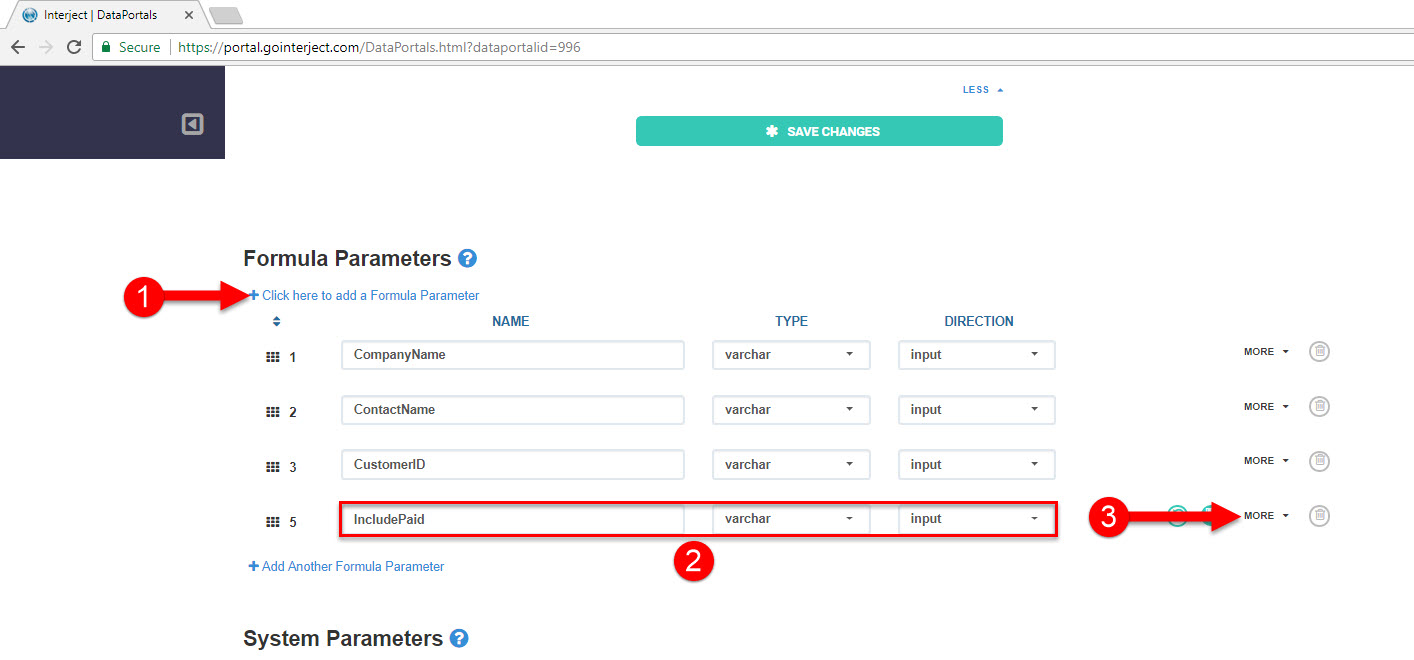
Step 4: You will use the existing Formula Parameters but for this example you need to add more. Select Click here to add a Formula Parameter. Enter IncludePaid for Name, varchar for Type, and input for direction. Click the More button.
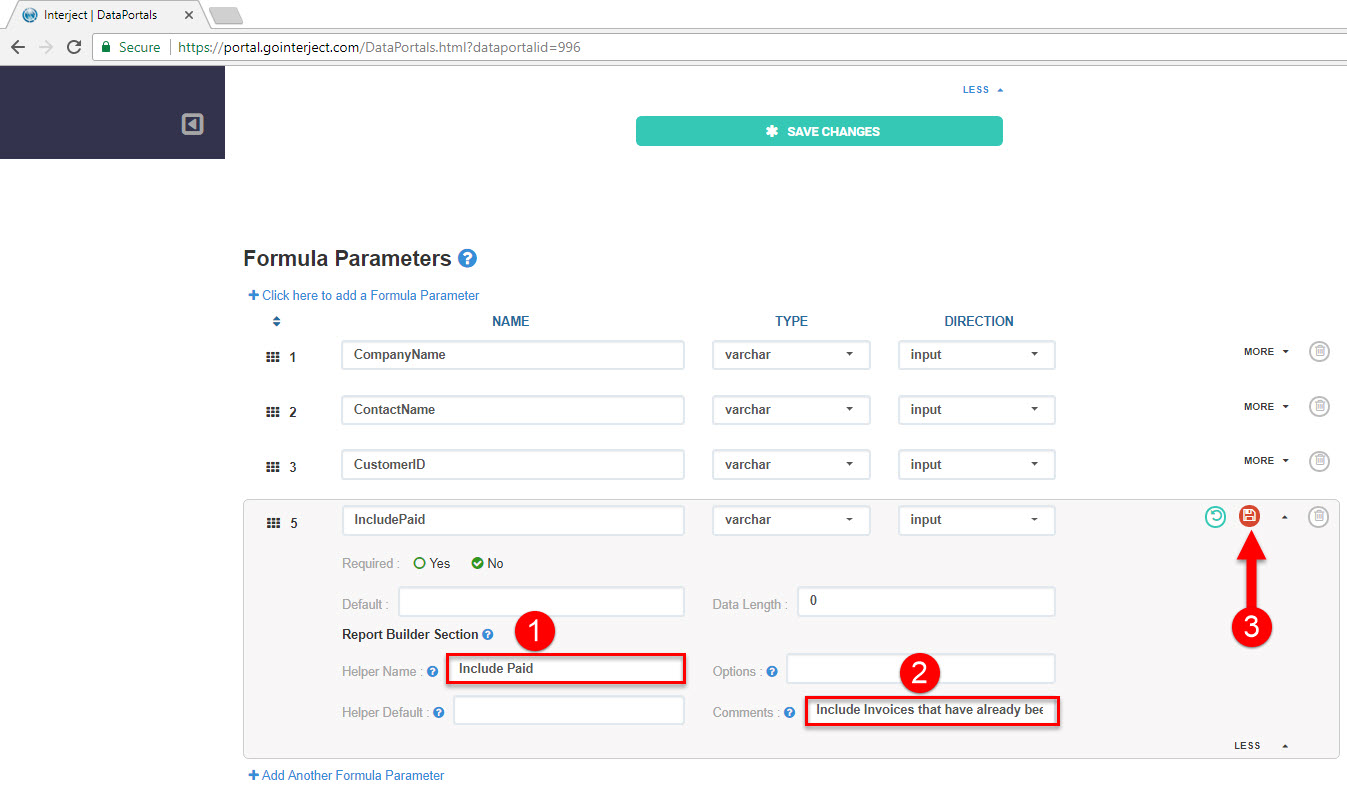
Enter Include Paid for Helper Name and enter Include Invoices that have already been paid for by the customer for Comments. Click the Save icon.
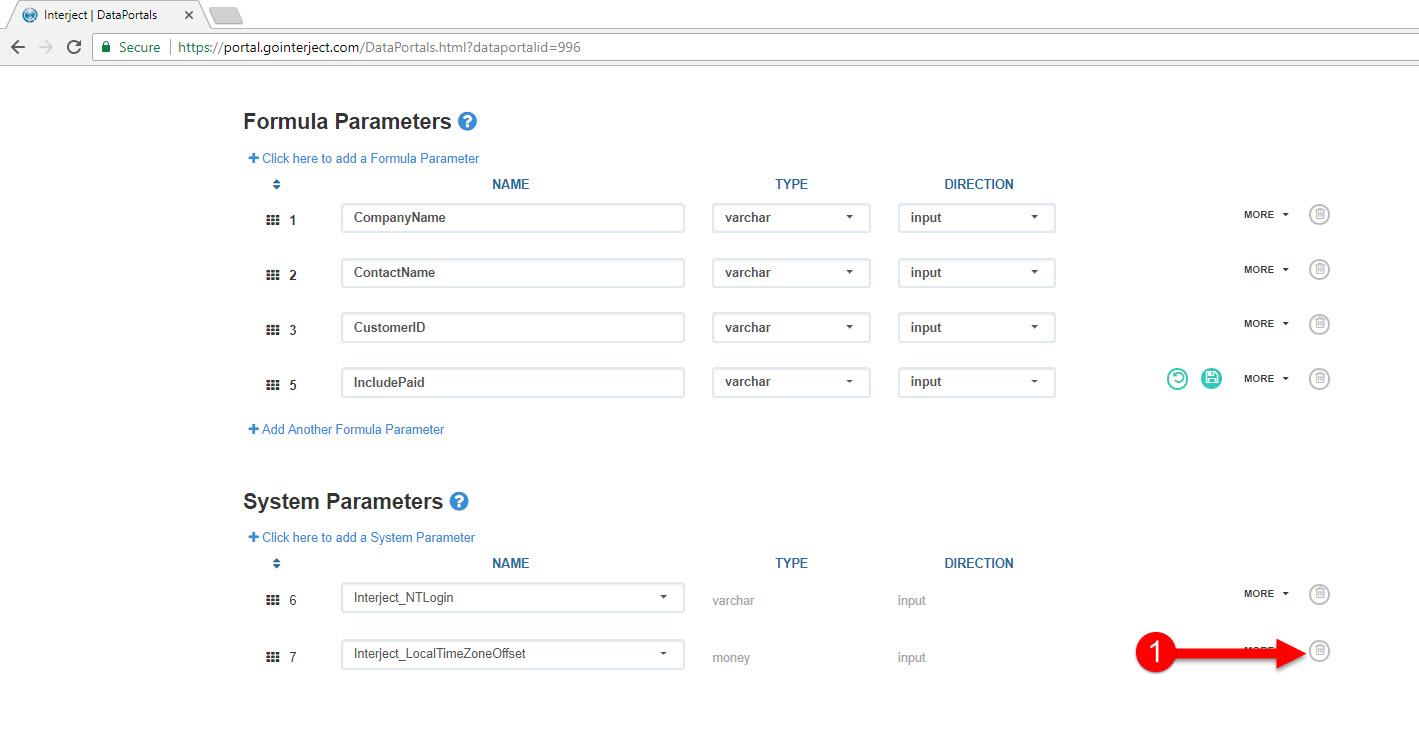
Step 5: Click the trash 🗑 can icon on the far right of the Interject_LocalTimeZoneOffset to delete it. You are going to a use a different System Parameter for this data portal to illustrate a new System Parameter that has not been presented in previous examples.
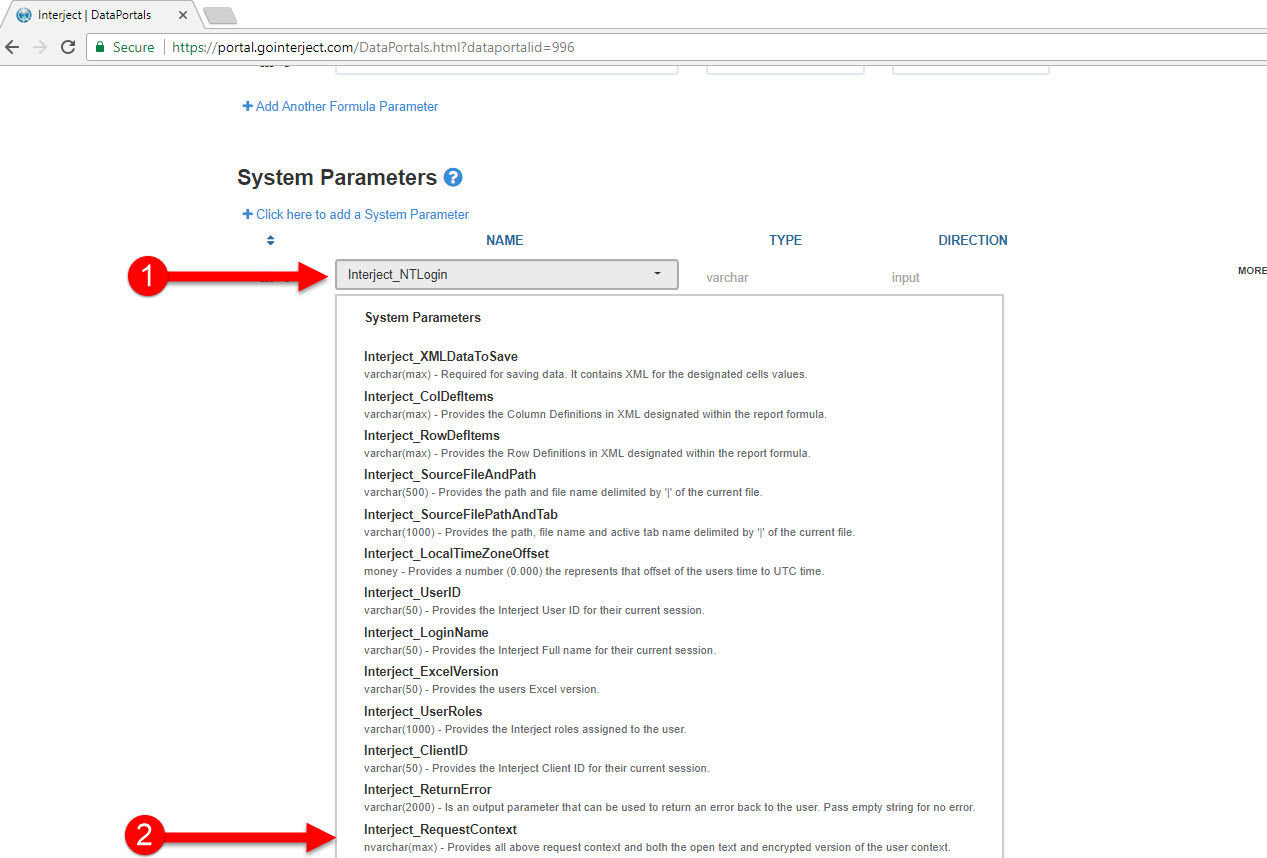
Step 6: Click the drop-down on the Interject_NTLogin and change it Interject_RequestContext. This System Parameter provides all request and user context that is available in a single XML string. It is best practices to use Interject_RequestContext as the only System Parameter since it reduces work over the long run. Since this parameter includes all system parameter information, the data portal configuration does not need to be changed if the stored procedure needs to reference additional context. Click Save.
Creating the Stored Procedure
Stored procedures or data APIs serve as a middle tier for an Interject report. In this example, you are using a stored procedure. Interject can retrieve one or more result sets from the stored procedure into the spreadsheet report.
The Interject Website Portal allows you to create and manage the data portals and reference stored procedures you create. Data portals are stored locally in your Excel session when you log into Interject. When requesting data, Interject creates a point-to-point connection with the intended data source.
The steps below assume you are proficient with SQL Management Studio for Microsoft SQL Server and in creating stored procedures. If you need additional training in this area, please contact us at info@gointerject.com.
Step 1: Create a stored procedure called [demo].[Northwind_Invoices_Pull_MyName] using the following example code. Please use your name in the suffix of the stored procedure name.
CREATE PROC [demo].[Northwind_Invoices_Pull_MyName]

   @CompanyName VARCHAR(100)
  ,@ContactName NVARCHAR(100)
  ,@CustomerID VARCHAR(500) = ''
  ,@IncludePaid VARCHAR(5) = 0
  ,@Interject_RequestContext NVARCHAR(MAX)

AS
BEGIN

SET NOCOUNT ON -- helps reduce conflicts with ADO

DECLARE @Interject_LoginName VARCHAR(200)
DECLARE @UtcOffset	DECIMAL(6,4)

-- Dataset has very old dates
-- To give a static date to compare to we hard coded the date.
DECLARE @DateCompare VARCHAR(20) = '1997-09-15'
DECLARE @ErrorMessage VARCHAR(100)

IF LEN(@CompanyName)>40
BEGIN
  SET @ErrorMessage = 'Usernotice:The company search text must not be more than 40 characters.'
  RAISERROR (@ErrorMessage, 18, 1)
  RETURN
END

-- This is another SP that parses the xml in request context to get the needed system data
EXEC [dbo].[RequestContext_Parse]
  @Interject_RequestContext		= @Interject_RequestContext
  ,@Interject_LoginName			= @Interject_LoginName	OUTPUT
  ,@UtcOffset = @UtcOffset OUTPUT

-- @IncludePaid is default 0.
-- if set to Yes, change it to 1
IF @IncludePaid = 'Yes'
  SET @IncludePaid = 1

-----------------------------------------------
--	REMAINDER OF DATA QUERY
-----------------------------------------------
--Create CTE that sorts data by InvoiceDate's difference from the hardcoded DateCompare
;WITH Invoice_CTE
AS
(
  SELECT
      [CustomerID]
    ,[InvoiceID]
    ,[InvoiceNum]
    ,[InvoiceTotal]
    ,[Current]
    ,[30Days]
    ,[60Days]
    ,[90Days]
    ,[IsPaid]
  FROM
  (
    SELECT
        i.[CustomerID]
      ,i.[InvoiceID]
      ,i.[InvoiceNum]
      ,i.[InvoiceDate]
      ,i.[InvoiceTotal]
      ,CASE WHEN DATEDIFF(dd,InvoiceDate,@DateCompare) < 30 THEN (i.[InvoiceTotal]) ELSE 0 END AS [Current]
      ,CASE WHEN DATEDIFF(dd,InvoiceDate,@DateCompare) BETWEEN 30 AND 59 THEN (i.[InvoiceTotal]) ELSE 0 END AS [30Days]
      ,CASE WHEN DATEDIFF(dd,InvoiceDate,@DateCompare) BETWEEN 60 AND 89 THEN (i.[InvoiceTotal]) ELSE 0 END AS [60Days]
      ,CASE WHEN DATEDIFF(dd,InvoiceDate,@DateCompare) > 90 THEN (i.[InvoiceTotal]) ELSE 0 END AS [90Days]
      ,@IncludePaid AS IsPaid
    FROM [demo].[Northwind_Invoices] i
  ) t
  WHERE [IsPaid] = @IncludePaid
  GROUP BY [CustomerID]
      ,[InvoiceID]
      ,[InvoiceNum]
      ,[InvoiceTotal]
      ,[Current]
      ,[30Days]
      ,[60Days]
      ,[90Days]
      ,[IsPaid]
)
-- Final Select statement
SELECT
    c.[CustomerID]
  ,c.[CompanyName]
  ,c.[ContactName]
  ,c.[ContactTitle]
  ,c.[Country]
  ,i.[InvoiceID]
  ,i.[InvoiceNum]
  ,i.[InvoiceDate]
  ,i.[OrderTotal]
  ,i.[Freight]
  ,i.[InvoiceTotal]
  ,i.[BillName]
  ,i.[BillAddress]
  ,i.[BillCity]
  ,i.[BillCountry]
  ,i.[IsPaid]
  ,o.[OrderID]
  ,cte.[IsPaid]
  ,cte.[Current]
  ,cte.[30Days]
  ,cte.[60Days]
  ,cte.[90Days]
  ,p.[PaidAmount]
  ,n.[KeyValue] AS Note
  ,d.[KeyValue] AS ExpectedDate
FROM [demo].[Northwind_Invoices] i
LEFT JOIN [demo].[Northwind_Customers] c
  ON i.[CustomerID] = c.[CustomerID]
LEFT JOIN Invoice_CTE cte
  ON cte.[InvoiceID] = i.[InvoiceID]
LEFT JOIN demo.Northwind_Payments p
  ON i.[InvoiceID] = p.[InvoiceID]
LEFT JOIN demo.Northwind_Orders o
  ON o.[CustomerID] = i.[CustomerID]
  AND o.[Freight] = i.[Freight]
LEFT JOIN demo.Northwind_InvoiceExternal n
  ON n.[InvoiceID] = i.[InvoiceID]
  AND n.[KeyName] = 'NOTE'
LEFT JOIN demo.Northwind_InvoiceExternal d
  ON d.[InvoiceID] = i.[InvoiceID]
  AND d.[KeyName] = 'ExpectedDate'
WHERE
  i.IsPaid = @IncludePaid
  AND
  (@CompanyName='' OR c.[CompanyName] LIKE '%' + @CompanyName + '%')
  AND
  (@ContactName='' OR c.[ContactName] LIKE '%' + @ContactName + '%')
  AND
  (@CustomerID='' OR c.[CustomerID] = @CustomerID)
ORDER BY c.[CompanyName]
    ,i.[InvoiceDate]
    ,i.[InvoiceID]

END
It is important to test the stored procedure in the database before testing it through the Interject platform. Using Interject_RequestContext requires the test scripts to be much longer than in the previous steps. To help with this extra text Interject will create the test code for you using the current users context.
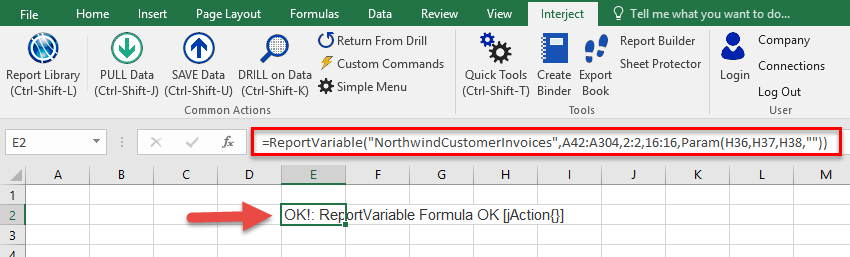
Step 2: First you must select a report formula that uses the data portal that is mapped to the stored procedure you want to test. You can quickly make a report formula and delete it since you are not creating the spreadsheet report yet. In a spreadsheet tab, in any cell, type
=ReportVariable("NorthwindCustomerInvoices",A42:A304,2:2,16:16,Param(H36,H37,H38,"")) but replace the Data Portal name with the name you created for your own example. Make sure the the cell with the ReportRange() formula is selected.
Step 3: Next, click Advanced Menu in the Interject Ribbon.

This button is a toggle, so if it is currently showing Simple Menu the advanced menu is already showing.

Step 4: Click the System dropdown and select View SQL Test for ActiveCell. A window will pop up providing the developer with the SQL template used to create the stored procedure.
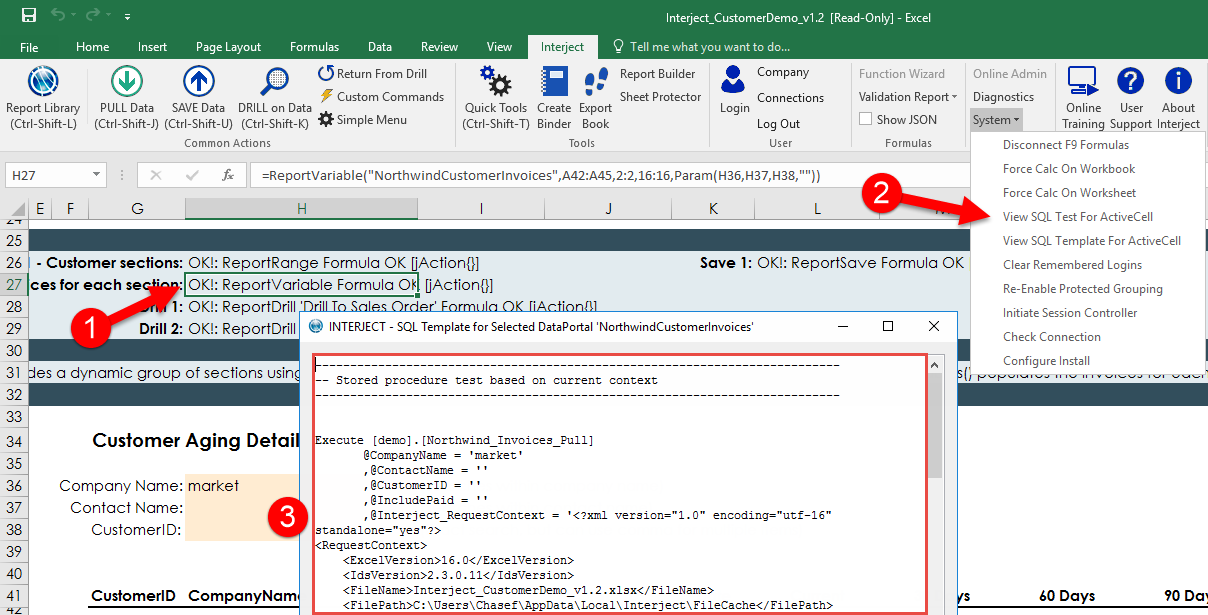
Step 5: Copy and paste the template code into the development environment, SQL Server Management Studio. The full text code is shown below.
Execute [demo].[Northwind_Invoices_Pull_MyName]
   @CompanyName = 'market'
  ,@ContactName = ''
  ,@CustomerID = ''
  ,@IncludePaid = ''
  ,@Interject_RequestContext = '<?xml version="1.0" encoding="utf-16" standalone="yes"?>
<RequestContext>
  <ExcelVersion>16.0</ExcelVersion>
  <IdsVersion>2.3.0.11</IdsVersion>
  <FileName>Interject_CustomerDemo_v1.xlsx</FileName>
  <FilePath>C:\Users\MaryM\AppData\Local\Interject\FileCache</FilePath>
  <TabName>CustomerAgingDetail</TabName>
  <CellRange>H27</CellRange>
  <SourceFunction>Ranges</SourceFunction>
  <UtcOffset>-7</UtcOffset>
  <ColDefItems>
    <Value Row="2" Column="1">
      <Name>CustomerId</Name>
    </Value>
    <Value Row="2" Column="2">
      <Name>InvoiceID</Name>
    </Value>
    <Value Row="2" Column="9">
      <Name>InvoiceNum</Name>
    </Value>
    <Value Row="2" Column="10">
      <Name>OrderID</Name>
    </Value>
    <Value Row="2" Column="11">
      <Name>InvoiceDate</Name>
    </Value>
    <Value Row="2" Column="12">
      <Name>Current</Name>
    </Value>
    <Value Row="2" Column="13">
      <Name>30Days</Name>
    </Value>
    <Value Row="2" Column="14">
      <Name>60Days</Name>
    </Value>
    <Value Row="2" Column="15">
      <Name>90Days</Name>
    </Value>
    <Value Row="2" Column="18">
      <Name>ExpectedDate</Name>
    </Value>
    <Value Row="2" Column="20">
      <Name>Note</Name>
    </Value>
    <Value Row="2" Column="21">
      <Name>[Clear]</Name>
    </Value>
  </ColDefItems>
  <ResultDefItems />
  <RowDefItems>
    <Value Row="46" Column="1" ColumnName="CustomerId">
      <Name>BOTTM</Name>
    </Value>
    <Value Row="53" Column="1" ColumnName="CustomerId">
      <Name>BOTTM</Name>
    </Value>
    <Value Row="60" Column="1" ColumnName="CustomerId">
      <Name>BOTTM</Name>
    </Value>
    <Value Row="67" Column="1" ColumnName="CustomerId">
      <Name>BOTTM</Name>
    </Value>
    <Value Row="74" Column="1" ColumnName="CustomerId">
      <Name>GREAL</Name>
    </Value>
    <Value Row="81" Column="1" ColumnName="CustomerId">
      <Name>GREAL</Name>
    </Value>
    <Value Row="88" Column="1" ColumnName="CustomerId">
      <Name>GREAL</Name>
    </Value>
    <Value Row="95" Column="1" ColumnName="CustomerId">
      <Name>GREAL</Name>
    </Value>
    <Value Row="102" Column="1" ColumnName="CustomerId">
      <Name>SAVEA</Name>
    </Value>
    <Value Row="109" Column="1" ColumnName="CustomerId">
      <Name>SAVEA</Name>
    </Value>
    <Value Row="116" Column="1" ColumnName="CustomerId">
      <Name>SAVEA</Name>
    </Value>
    <Value Row="123" Column="1" ColumnName="CustomerId">
      <Name>SAVEA</Name>
    </Value>
    <Value Row="130" Column="1" ColumnName="CustomerId">
      <Name>WHITC</Name>
    </Value>
    <Value Row="137" Column="1" ColumnName="CustomerId">
      <Name>WHITC</Name>
    </Value>
    <Value Row="144" Column="1" ColumnName="CustomerId">
      <Name>WHITC</Name>
    </Value>
    <Value Row="151" Column="1" ColumnName="CustomerId">
      <Name>WHITC</Name>
    </Value>
  </RowDefItems>
  <UserContext>
  <MachineLoginName>MaryM</MachineLoginName>
  <MachineName>.</MachineName>
  <FullName> </FullName>
  <UserId>UUvP4HYoeu</UserId>
  <ClientId>CgCfW9qi</ClientId>
  <LoginName>MaryM@mycompany.com</LoginName>
  <LoginAuthTypeId>10</LoginAuthTypeId>
  <LoginDateUtc>05/03/2018 5:39:48</LoginDateUtc>
  <UserRoles>
    <Role>ClientAdmin</Role>
  </UserRoles>
</UserContext>
  <UserContextEncrypted>Encrypted only through interject api protocol, not direct connection</UserContextEncrypted>
  <XMLDataToSave></XMLDataToSave>
</RequestContext>'
Step 7: When this code is executed, it returns the following result set.

Create the Report
At this point you, have a tested a new stored procedure that uses parameters to filter the results. You set up an Interject data connection to go to your example database and you added another Interject data portal to use that connection, which is mapped to the stored procedure that you just created. So now you are ready to build the spreadsheet report using two data portals.
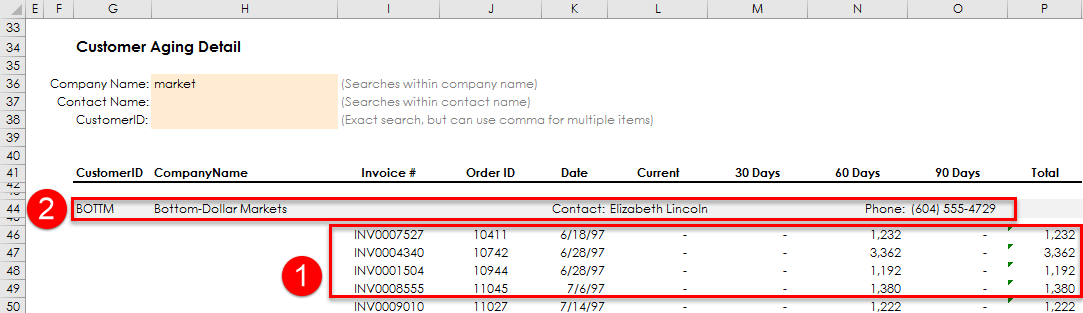
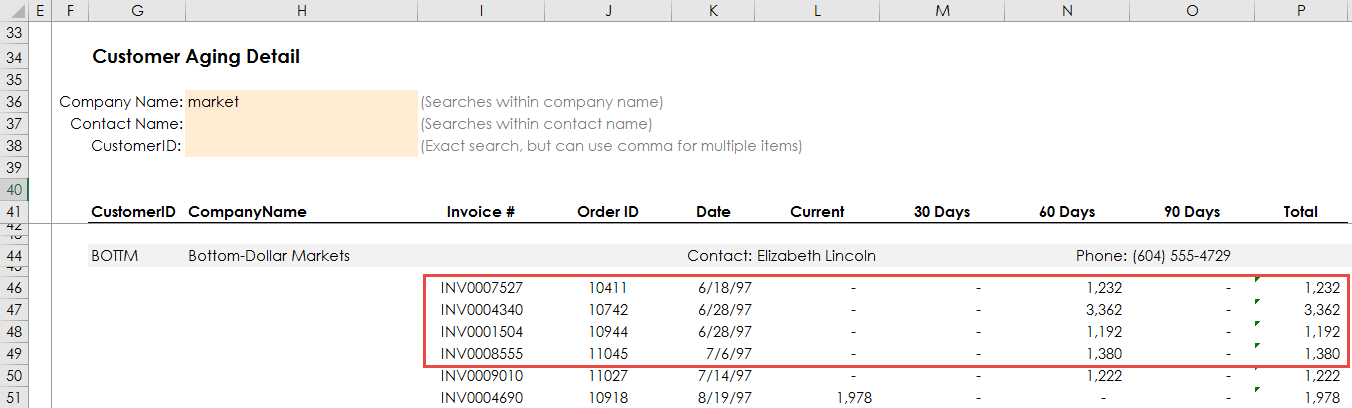
The steps for building the spreadsheet report are in the example Customer Aging Detail. You have likely completed this in earlier training sessions. Repeat the instructions with your newly created data portals discussed in this topic. When you are done, your report should resemble the screenshot below.
Creating a New Data Portal With Multiple Record Sets
You just created a report that used ReportRange() to list all the customers with subtotaled regions. Then ReportVariable() was used to populate the invoices for each customer region. Two separate data portals were used and two connections were made to the database.
To illustrate the multiple record set feature of Interject, you can take this one step further. You can copy the second data portal and stored procedure and modify it so that it returns both record sets. In this approach, you make only one connection to the database, which is more efficient. And this process requires one less data portal and stored procedure to create.
Multiple record sets are a very efficient report approach when your data is not a simple list. In this example the feature will work as follows. On the first data request two record sets are retrieved by Interject. ReportRange() uses the customer summary list record set but both record sets temporarily remain in memory until all report formulas are completed. This allows the ReportVariable() to access the second record set for populating the details in the same report run. The following steps will help you create this change yourself.
Step 1: Navigate to the data portal that you just created, similar to NorthwindCustomerInvoices_MyName, and click the green clone button on the top right of the page.
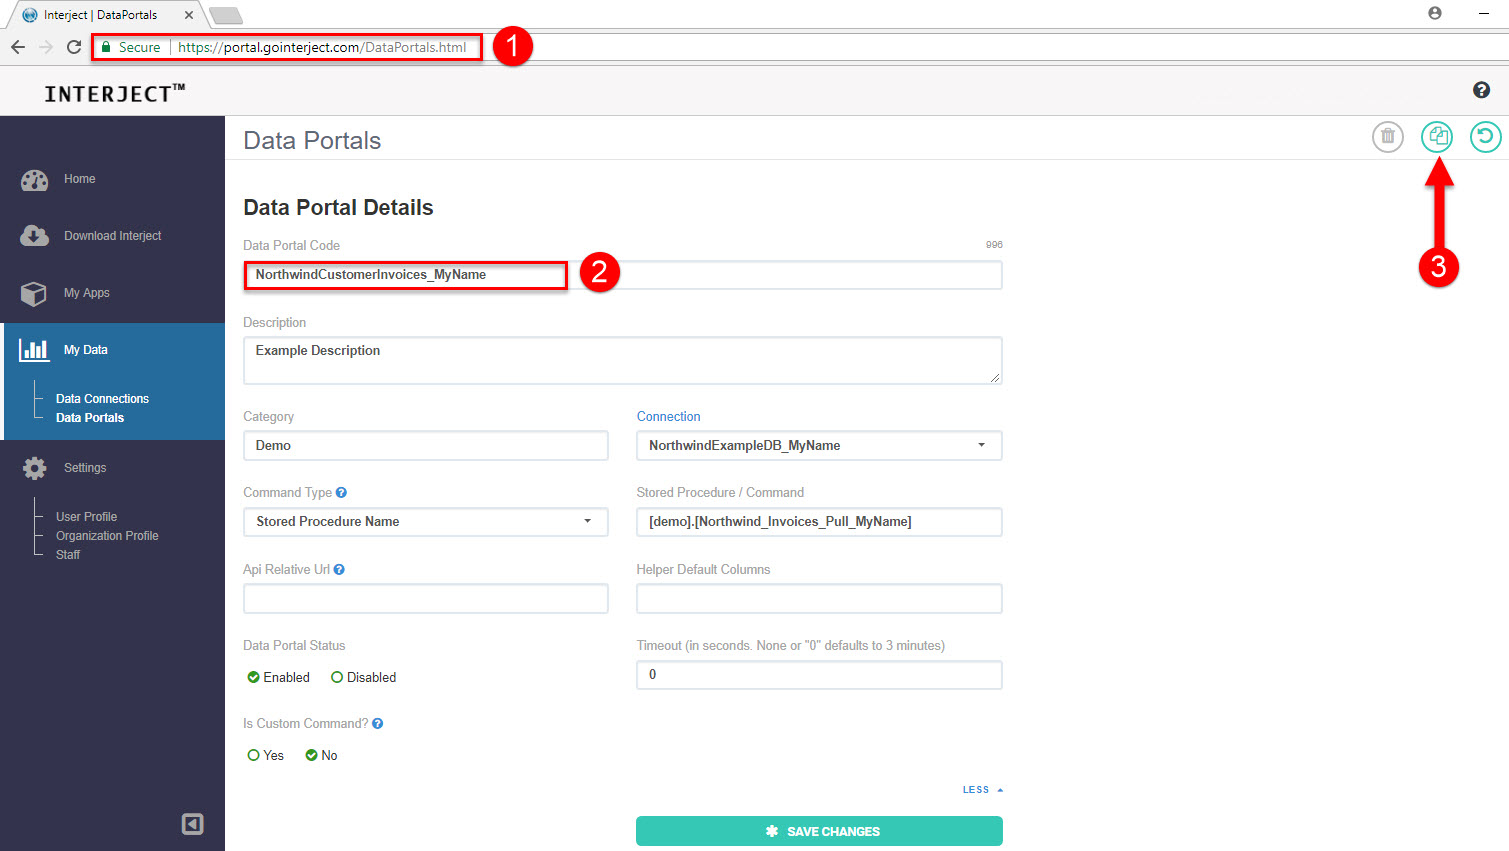
Step 2: A new data portal named, NorthwindCustomerInvoices_MyName_copy, generates. Change this data portal name to NorthwindMultiRecord_MyName. You can add your name to the suffix, because each data portal code must be unique.
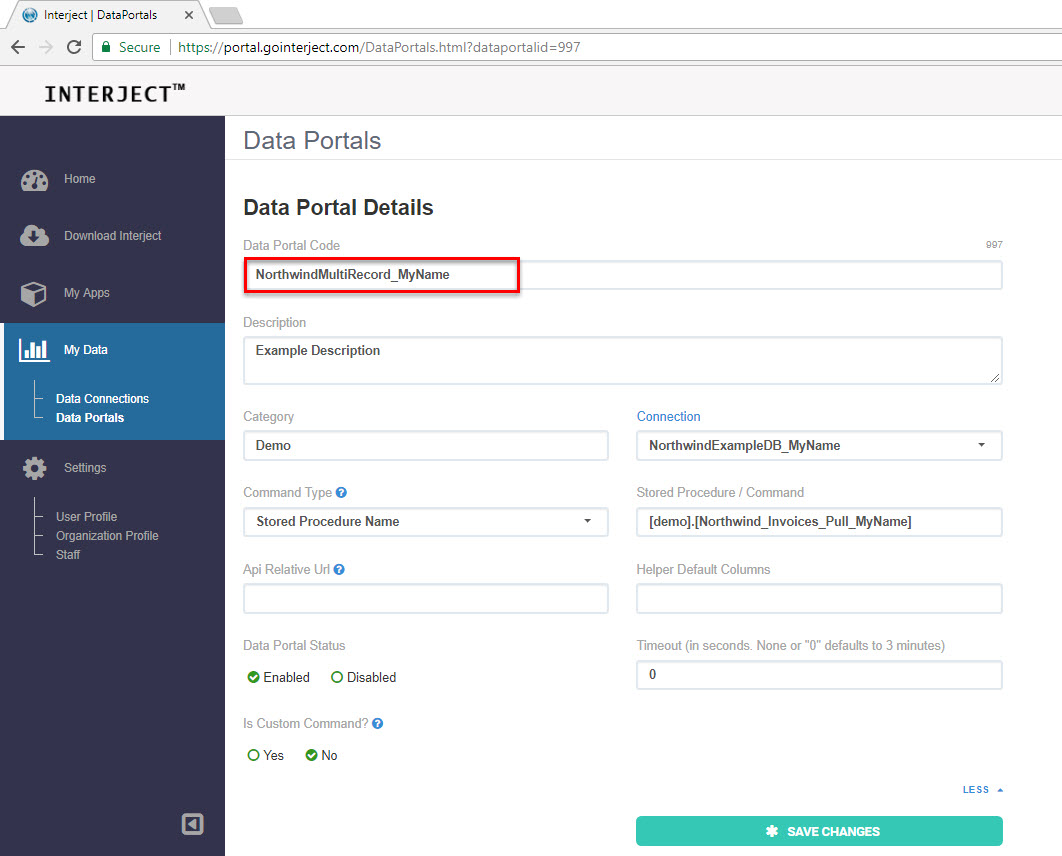
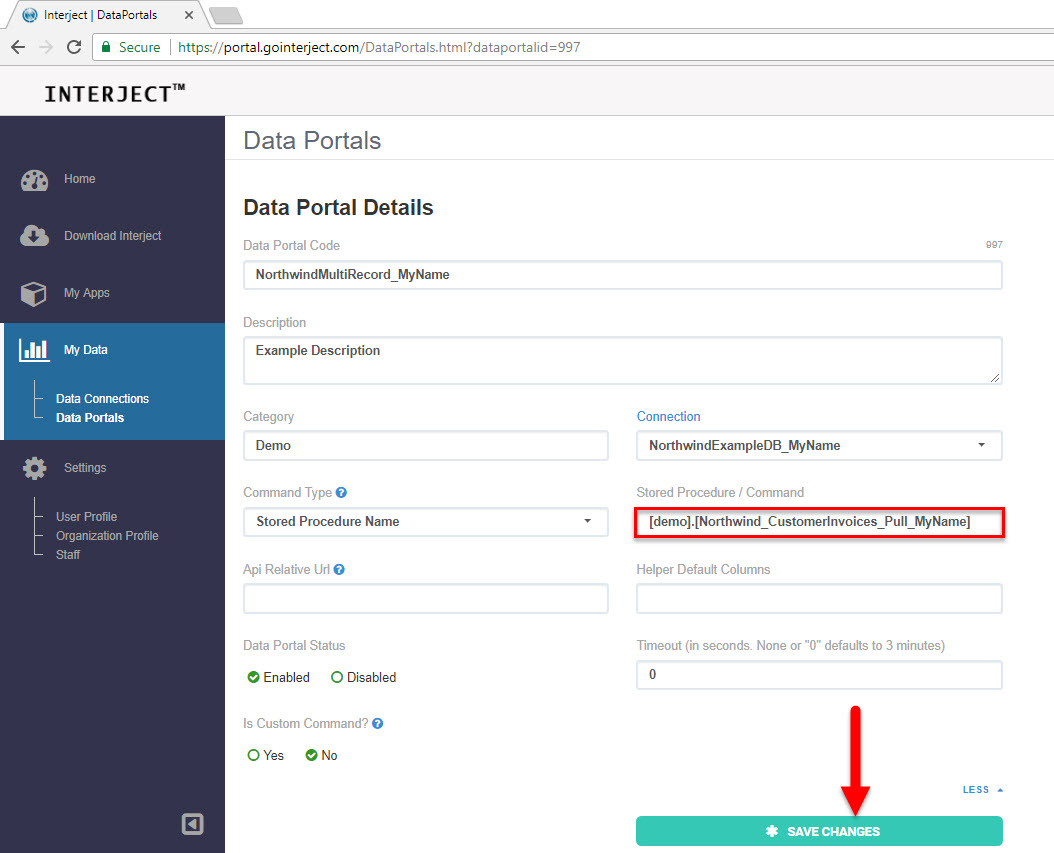
Step 3: Change the procedure name to run [demo].[Northwind_CustomerInvoices_Pull_MyName] but use your own name as the suffice. You will create this stored procedure shortly. Everything else in the cloned data portal remains the same.
Updating the Stored Procedure for 2 Record Sets
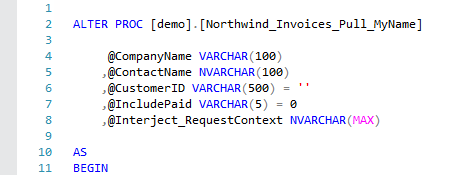
Step 1: In SQL Server Management Studio, open the stored procedure used in the report that pulled the invoice detail. The stored procedure name should be similar to [demo].[Northwind_Invoices_Pull_MyName].
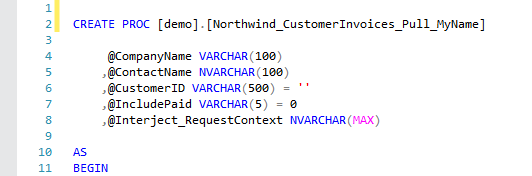
Step 2: Change the name of the stored procedure to [demo].[Northwind_CustomerInvoices_MyName], using your own name as the suffix. By using Create Procedure as shown below, the stored procedure will be copied to the new name when executed.
Step 3: Change the Create procedure back to Alter procedure and continue with editing the new procedure.
Step 4: You have to make a few changes to the stored procedure so the summary record set showing a list of customers can be provided. First add into #InvoiceDetail as shown below. It will put the invoice detail in a temporary table to be used later in the stored procedure.
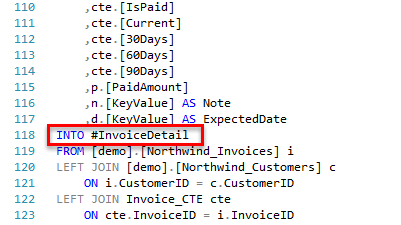
Step 5: After the SQL statement, add Select * from #InvoiceDetail. Then order by the CustomerID. This step returns the invoice detail as the first record set from the stored procedure.
Step 6: Next you must use the detail to generate a customer summary list. The below code should be copied into the bottom of the stored procedure. This code simply creates a distinct list of all the customers include in the invoice detail and orders by the customer name.
Steps 5 and 6 should look like below:
  -- Select all detail from the dataset created above
  SELECT * FROM #InvoiceDetail
  ORDER BY [CustomerID]

  -- Select unique customers to form a summary list of all of the customers.
  SELECT DISTINCT
  	 [CustomerID]
  	,[CompanyName]
  	,[ContactName]
  	,[ContactTitle]
  	,[Country]
  FROM #InvoiceDetail
  ORDER BY CustomerID
Step 7: The changes to the stored procedure are complete. It is important to test the stored procedure in the database before testing it through the Interject platform. You can use the same test script used earlier in this topic. Your test code should look similar to the SQL below.
Execute [demo].[Northwind_CustomerInvoices_Pull_MyName]
  @CompanyName = 'market'
  ,@ContactName = ''
  ,@CustomerID = ''
  ,@IncludePaid = ''
  ,@Interject_RequestContext = '<?xml version="1.0" encoding="utf-16" standalone="yes"?>
<RequestContext>
  <ExcelVersion>16.0</ExcelVersion>
  <IdsVersion>2.3.0.11</IdsVersion>
  <FileName>Interject_CustomerDemo_v1.xlsx</FileName>
  <FilePath>C:\Users\Marym\AppData\Local\Interject\FileCache</FilePath>
  <TabName>CustomerAgingDetail</TabName>
  <CellRange>H27</CellRange>
  <SourceFunction>Ranges</SourceFunction>
  <UtcOffset>-7</UtcOffset>
  <ColDefItems>
    <Value Row="2" Column="1">
      <Name>CustomerId</Name>
    </Value>
    <Value Row="2" Column="2">
      <Name>InvoiceID</Name>
    </Value>
    <Value Row="2" Column="9">
      <Name>InvoiceNum</Name>
    </Value>
    <Value Row="2" Column="10">
      <Name>OrderID</Name>
    </Value>
    <Value Row="2" Column="11">
      <Name>InvoiceDate</Name>
    </Value>
    <Value Row="2" Column="12">
      <Name>Current</Name>
    </Value>
    <Value Row="2" Column="13">
      <Name>30Days</Name>
    </Value>
    <Value Row="2" Column="14">
      <Name>60Days</Name>
    </Value>
    <Value Row="2" Column="15">
      <Name>90Days</Name>
    </Value>
    <Value Row="2" Column="18">
      <Name>ExpectedDate</Name>
    </Value>
    <Value Row="2" Column="20">
      <Name>Note</Name>
    </Value>
    <Value Row="2" Column="21">
      <Name>[Clear]</Name>
    </Value>
  </ColDefItems>
  <ResultDefItems />
  <RowDefItems>
    <Value Row="46" Column="1" ColumnName="CustomerId">
      <Name>BOTTM</Name>
    </Value>
    <Value Row="61" Column="1" ColumnName="CustomerId">
      <Name>BOTTM</Name>
    </Value>
    <Value Row="76" Column="1" ColumnName="CustomerId">
      <Name>BOTTM</Name>
    </Value>
    <Value Row="91" Column="1" ColumnName="CustomerId">
      <Name>BOTTM</Name>
    </Value>
    <Value Row="106" Column="1" ColumnName="CustomerId">
      <Name>GREAL</Name>
    </Value>
    <Value Row="117" Column="1" ColumnName="CustomerId">
      <Name>GREAL</Name>
    </Value>
    <Value Row="128" Column="1" ColumnName="CustomerId">
      <Name>GREAL</Name>
    </Value>
    <Value Row="139" Column="1" ColumnName="CustomerId">
      <Name>GREAL</Name>
    </Value>
    <Value Row="150" Column="1" ColumnName="CustomerId">
      <Name>SAVEA</Name>
    </Value>
    <Value Row="173" Column="1" ColumnName="CustomerId">
      <Name>SAVEA</Name>
    </Value>
    <Value Row="196" Column="1" ColumnName="CustomerId">
      <Name>SAVEA</Name>
    </Value>
    <Value Row="219" Column="1" ColumnName="CustomerId">
      <Name>SAVEA</Name>
    </Value>
    <Value Row="242" Column="1" ColumnName="CustomerId">
      <Name>WHITC</Name>
    </Value>
    <Value Row="258" Column="1" ColumnName="CustomerId">
      <Name>WHITC</Name>
    </Value>
    <Value Row="274" Column="1" ColumnName="CustomerId">
      <Name>WHITC</Name>
    </Value>
    <Value Row="290" Column="1" ColumnName="CustomerId">
      <Name>WHITC</Name>
    </Value>
  </RowDefItems>
  <UserContext>
  <MachineLoginName>MaryM</MachineLoginName>
  <MachineName>.</MachineName>
  <FullName> </FullName>
  <UserId>UUvP4HYoeu</UserId>
  <ClientId>CgCfW9qi</ClientId>
  <LoginName>Mary@mycompany.com</LoginName>
  <LoginAuthTypeId>10</LoginAuthTypeId>
  <LoginDateUtc>05/03/2018 5:39:48</LoginDateUtc>
  <UserRoles>
    <Role>ClientAdmin</Role>
  </UserRoles>
</UserContext>
  <UserContextEncrypted>Encrypted only through interject api protocol, not direct connection</UserContextEncrypted>
  <XMLDataToSave></XMLDataToSave>
</RequestContext>'
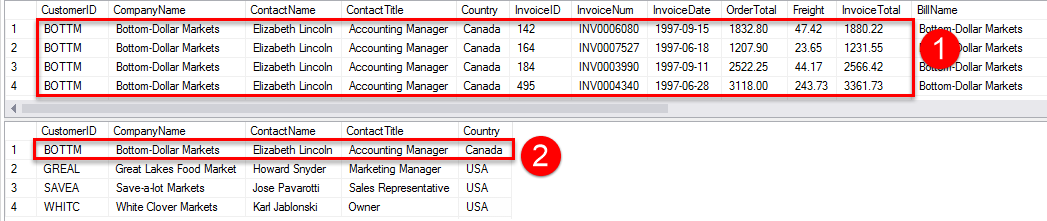
When this code is executed, it should return two record sets as shown below.
Updating the Report for 2 Record Sets
You are ready to modify the report to use your new data portal. The changes are simple since you only need to use a new function, jDataPortal(), to specify the data portal record set number for each report function.
Step 1: In the Customer Aging Detail report that you just completed, change the =ReportRange() function by replacing the previous data portal with the new one. However, you will be encasing the new data portal inside a jDataPortal() function. So =ReportRange(“oldDataPortalCode”,.. becomes =ReportRange(jDataPortal(“NorthwindMultiRecord_MyName”,2),… The end result should look like the below screenshot for ReportRange().
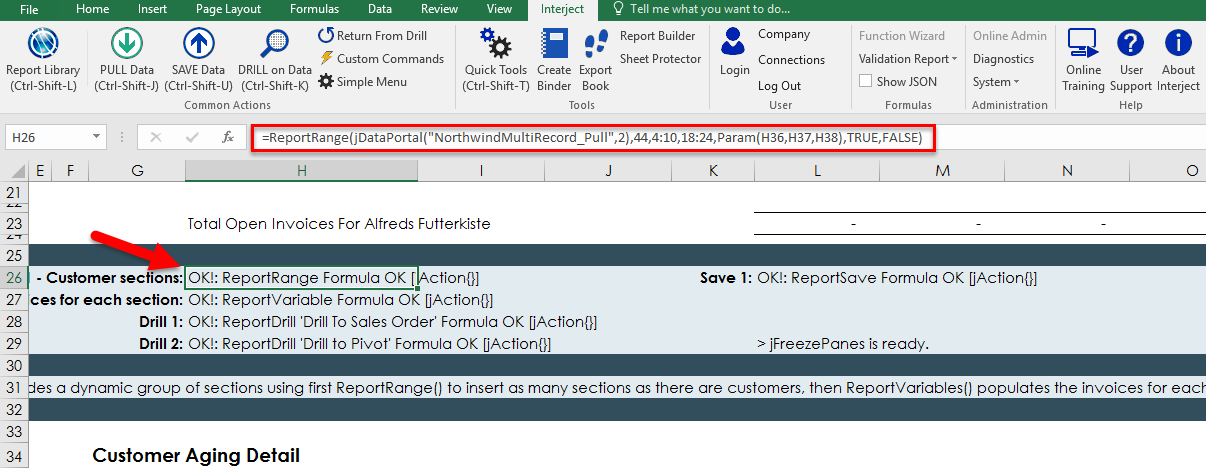
The second parameter, DataResultNumber, indicates which record set this report function will use. Using 2 causes the ReportRange() function to grab the second record set that is a simple list of customers.
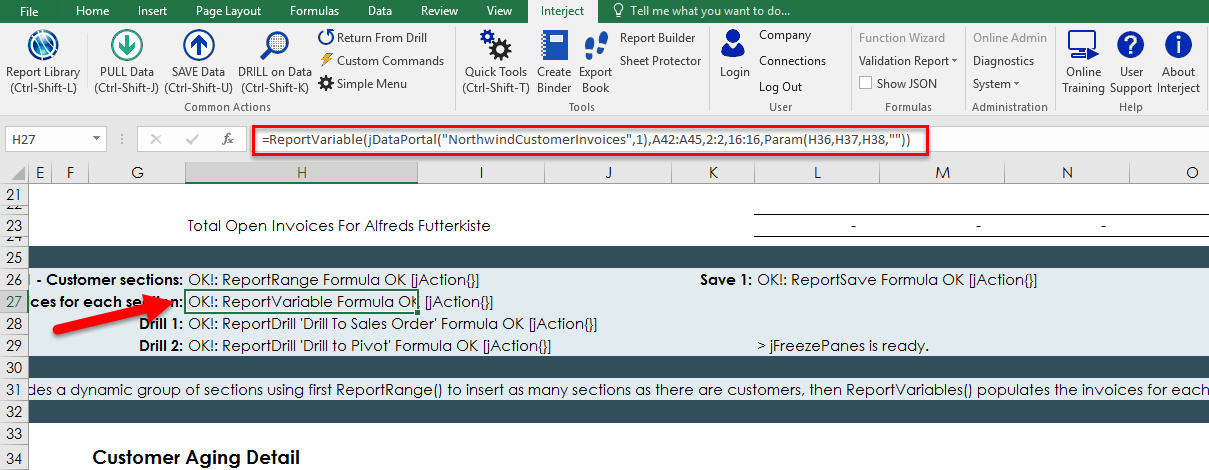
Step 2: Now change the =ReportVariable() function by replacing the previous data portal with the new one. Again you must encase the new data portal inside a jDataPortal() function. So =ReportVariable("oldDataPortalCode",… becomes =ReportVariable(jDataPortal("NorthwindMultiRecord_MyName",1),… In this step you are using 1 so the first record set is used in this report function. The end result should look like the below screenshot for ReportVariable().
Step 3: Once the report formulas are edited, you can re-pull the data in the report and the results should be the same as when it used two data portals. Notice that (1) the customer account detail is presented as well as (2) the customer information.