Contributing
Estimated reading time: 30 minutesOverview
Hello and thank you for wanting to make a contribution to Interject. These are the guidelines that we use to make sure our documentation is the highest quality, and consistent. Included in this document is the documentation cycle from creation to approval.
Setup
Setting Up A Local Environment
For editors of the documentation, it is necessary to set up a local environment where you can edit and preview changes before pushing them to the repository. The following lists the basics steps to do this. For detailed instructions on setting up a local environment for documentation editing, see our Clickup page
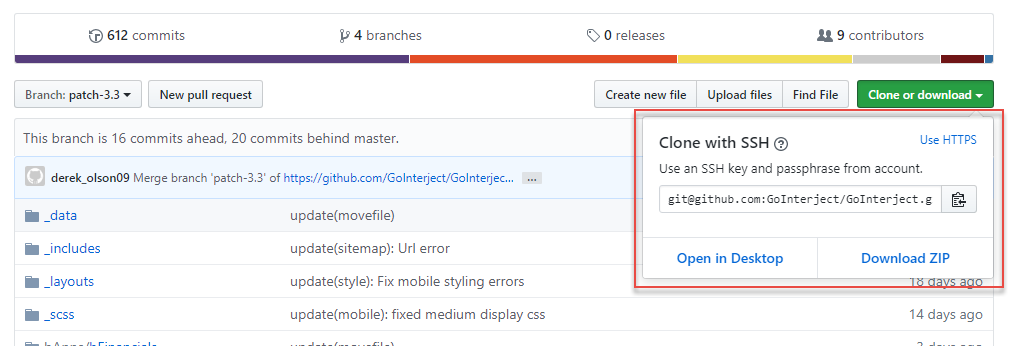
Step 1: Navigate to our Github Repository.
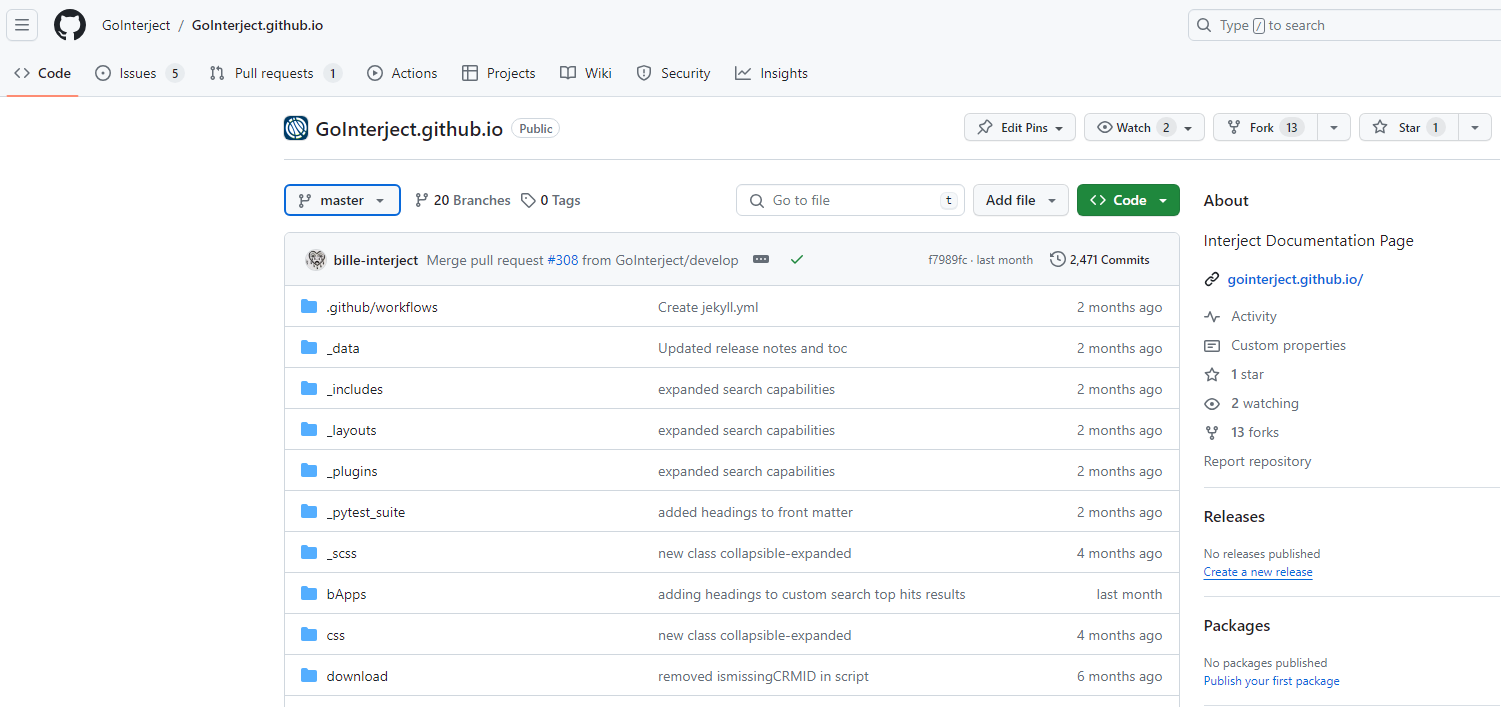
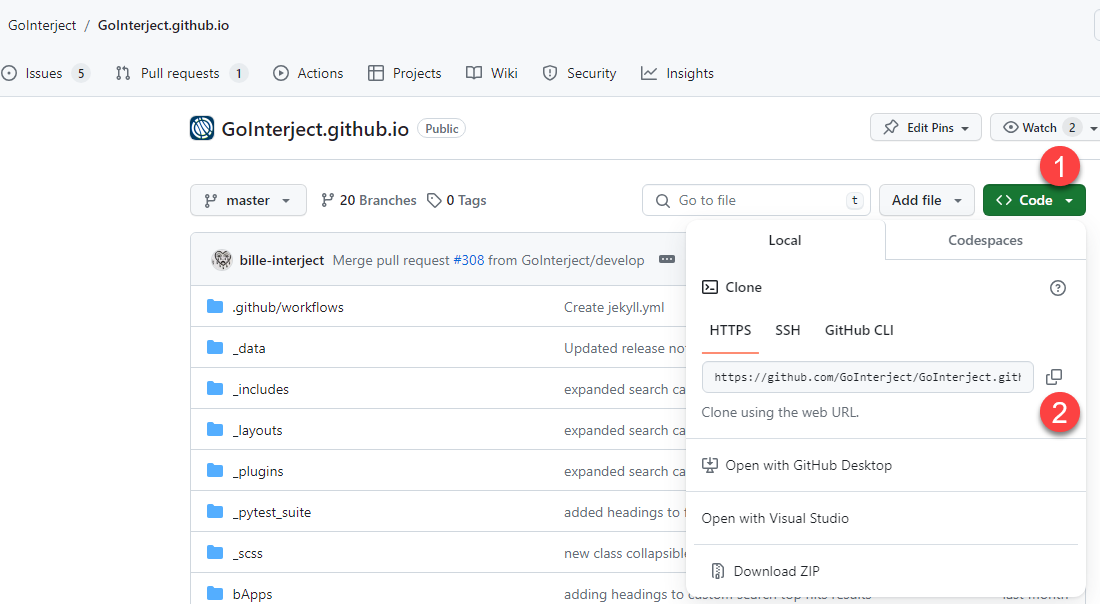
Click the clone button and then the copy to clipboard icon to copy the repository's URL.
Step 2: Navigate to a local folder where you want to clone the repository.
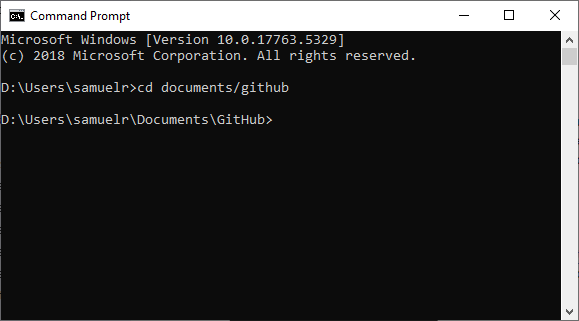
Execute the git clone command (be sure to paste the url you copied):
git clone https://github.com/GoInterject/GoInterject.github.io.git
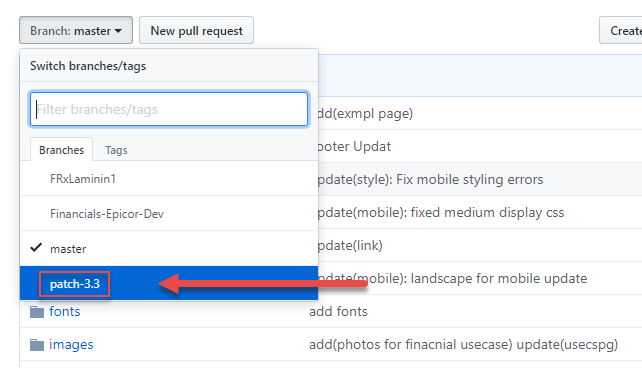
Step 3: Make your changes locally to a local git branch.
Step 4: Push your changes to the repo using the git push command.
git push origin local_branch:remote_branch
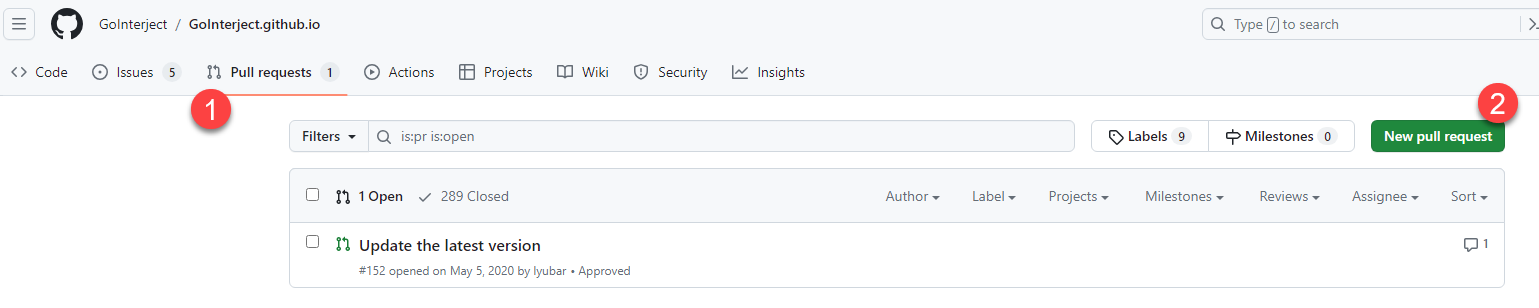
Step 5: Make a pull request to merge the remote_branch you pushed the changes to into the develop branch.
Click Pull requests in the header and then New pull request.
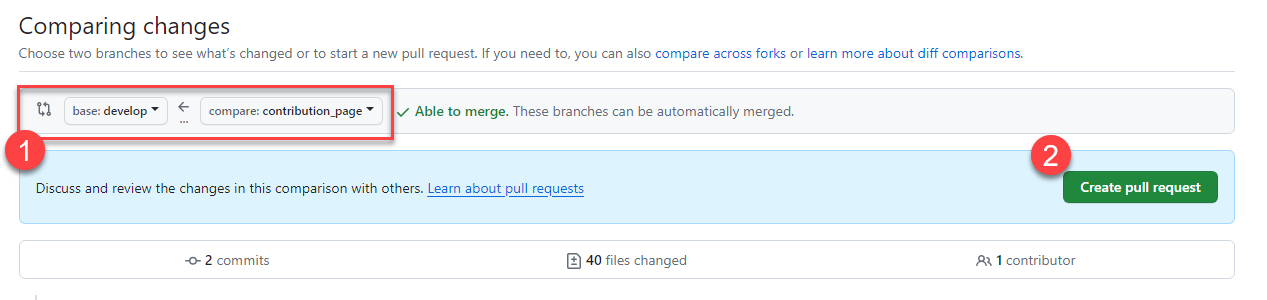
Ensure you are requesting to merge your branch into the develop branch. Click Create pull request.
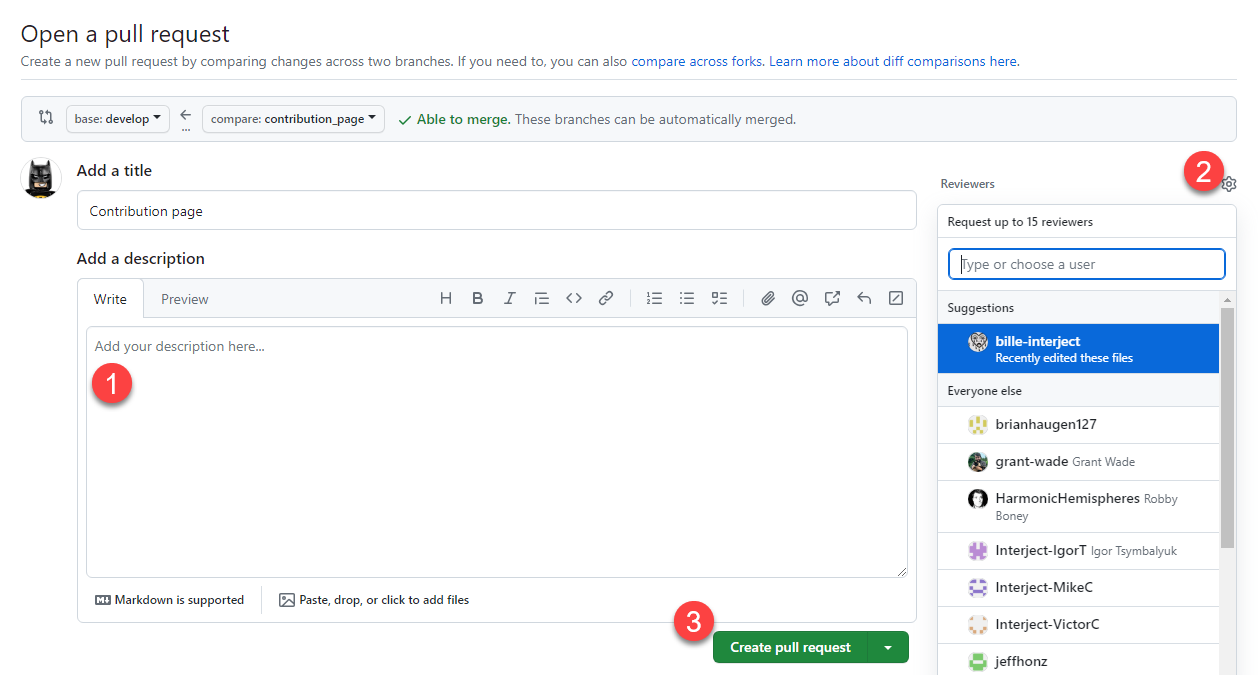
Write a description and then click the Reviewers settings button to choose a reviewer. Finally click Create pull request.
Commit Messages
All commit messages should follow this general layout. This is to ensure consistency in determining what has been changed.
action(thingchanged): description of the change
| Actions | When to Use |
|---|---|
| update | This should be used when content currently exists, and you are modifying. I.e. grammatical error fixes, or replacing images |
| add | This action type should be used when you are creating a content page initially. |
| remove | This action type is to be used when you are removing a section or an entire page of documentation. |
| create | This should be used when you are creating a new section to existing documentation. |
The "thingchanged" should be a single word noun that describes as best as possible, the piece of UI that was changed. The "description of the change" should be an accurate description as to what in more detail was changed.
Example:
update(screenshots): replaced old SS's with new ones to match UI changes
Screenshots
Screenshots are used heavily in our documentation. Below are our conventions and our process of including screenshots in the documentation.
Screenshot Software Requirements
Screenshots for our website are made consistent by using a screen capture program called Snagit.
In order to keep screenshots consistent, make sure they are captured in the most current Interject/Excel version. For reference, keep the screenshots consistent with the other images in the documentation in regards to color scheme, menu items, size, etc.
When to Include a Screenshot
Every major step in a documentation page should be represented in a screenshot. Screenshots can contain multiple steps, but every step in the process of a lab or walkthrough should be shown somewhere in a screenshot. The user should be able to look at only the screenshots on a page and know exactly what to do.
The following is a simple walkthrough of the recommended screenshot procedure. It is organized by the type of action/step the user is being instructed to take in a given screenshot. There will also be example use cases for some of the screenshot techniques in each section.
Company and Email
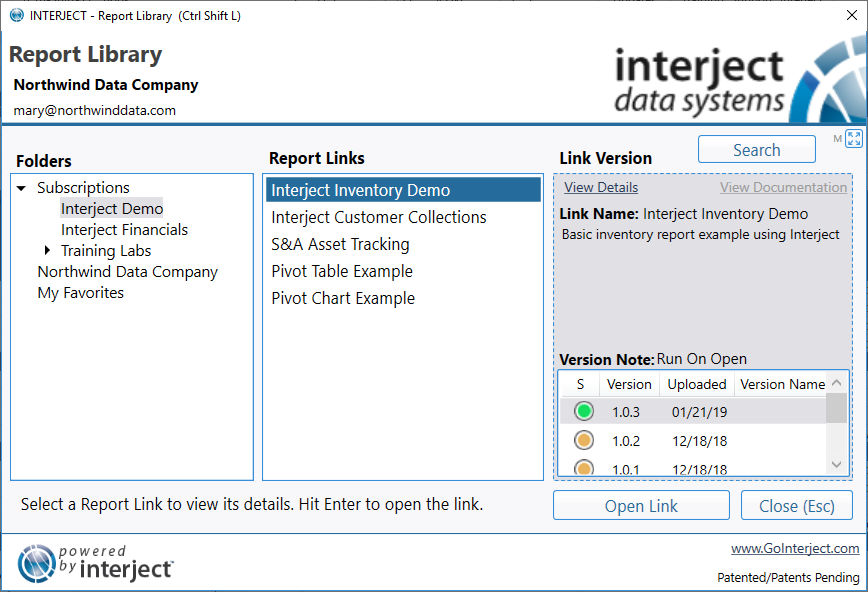
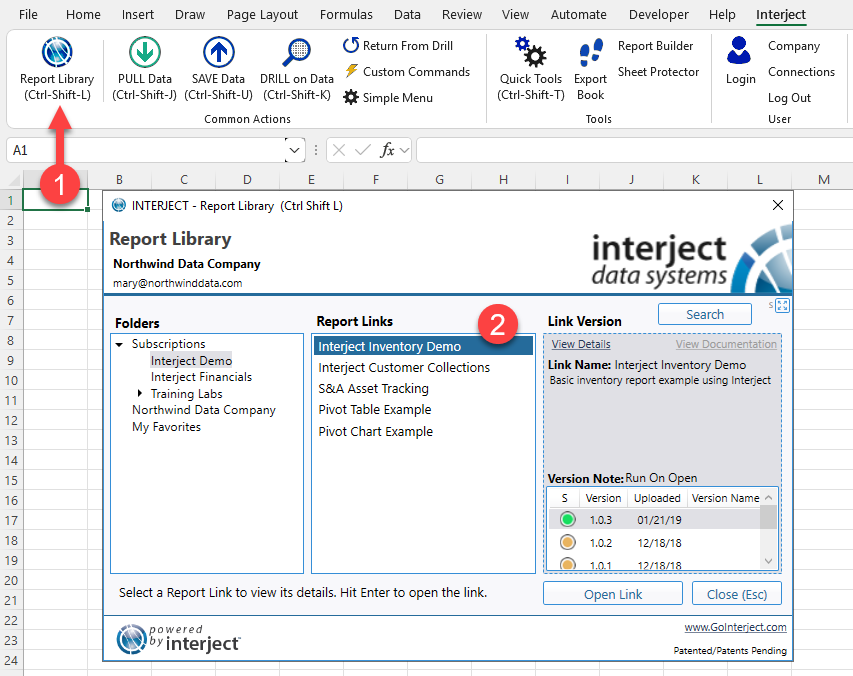
All screenshots should use the Northwind Data Company as the example and a generic email such as mary@northwinddata.com:
Sensitive Information
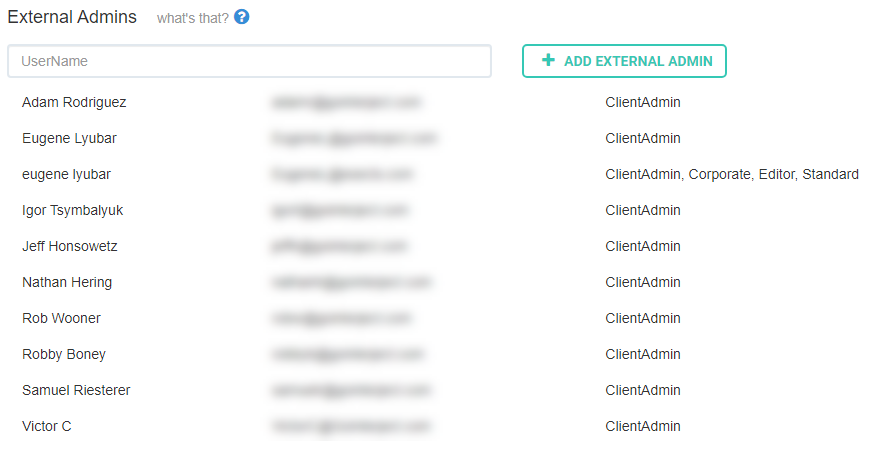
If sensitive information must be displayed (e.g. emails), blur them out:
Click Action (Arrow)
If the instructions call for a click action, use a solid, red arrow pointing to the click location.
Arrows should be:
- red,
- 7px in thickness,
- below the item if possible,
- have a middle-centered shadow behind them.
No arrow is needed for "Next", "Finish" or "Ok" actions, or when only a single button is used in a screenshot.
When to use an arrow in a screenshot:
- For pointing to click actions:

- To point to specific step items:

It is important to place arrows where they are easily seen and not to block important visual information.
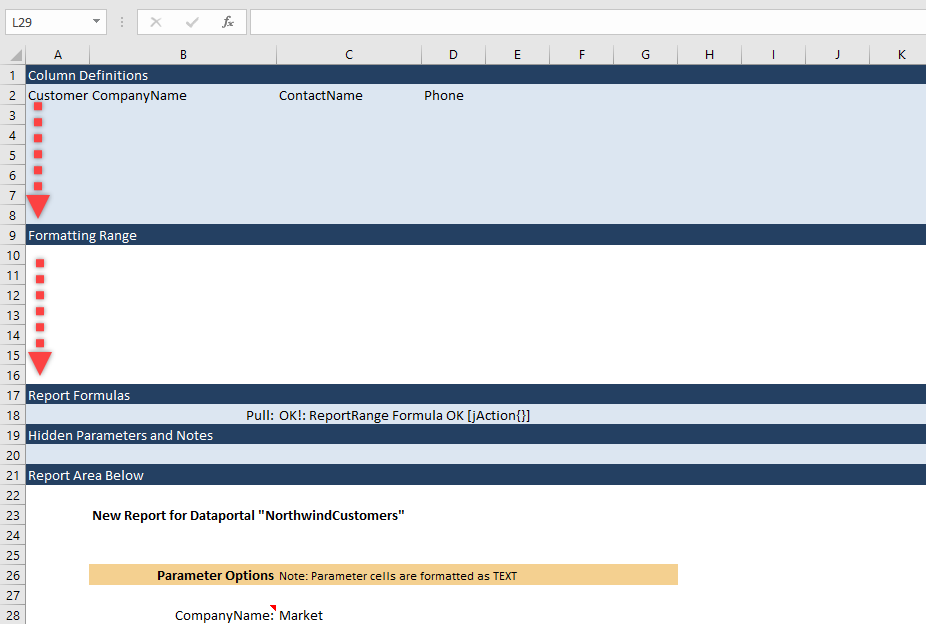
Dotted Arrows
A dotted arrow can be used to indicate an expanding of rows or columns.
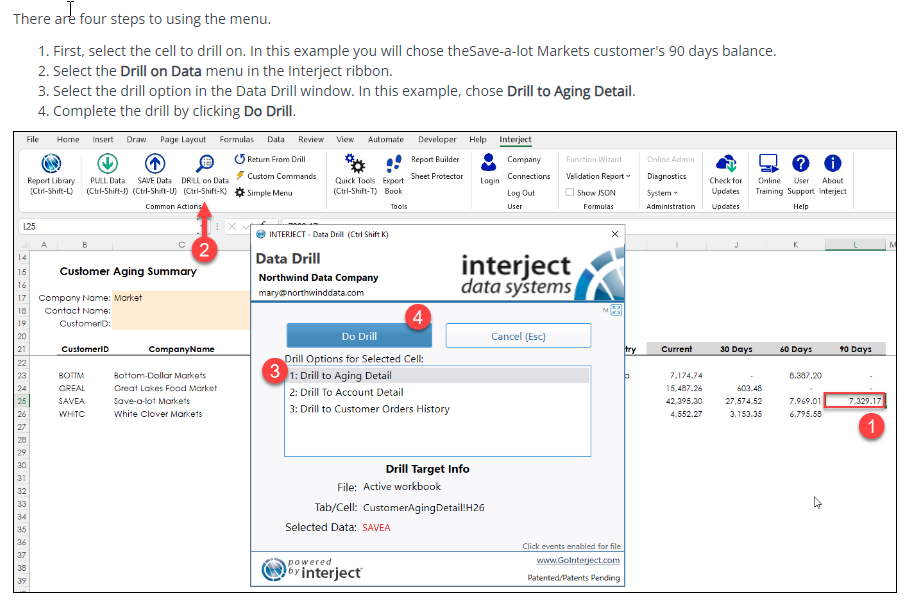
Multi-Step Actions in a Single Screenshot (Numbered Steps)
If multiple steps are contained in one image, label the steps 1, 2, 3, etc. in Snagit. This gives readers more direction when steps are complex.
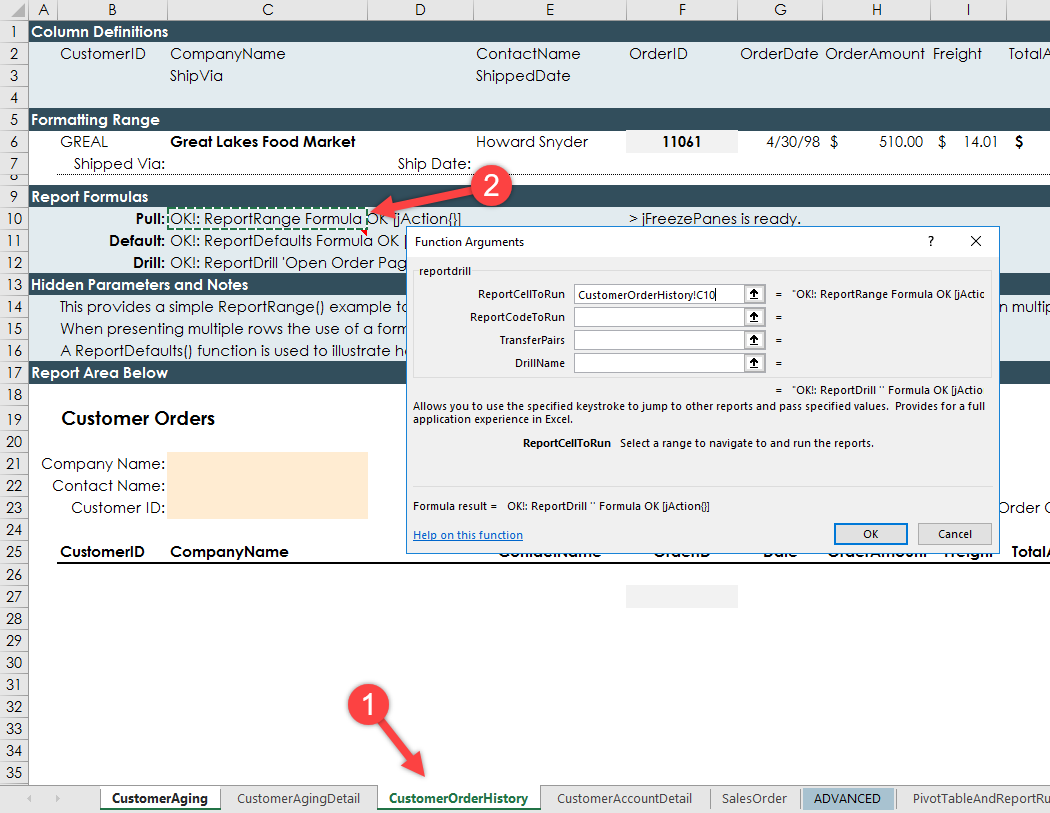
When using arrows and numbers together, always connect the arrow to a number and ensure that the arrow is projecting from the center of the number circle.
Number-labeled steps should be:
- red,
- made using the numbering feature of Snagit,
- have a middle-centered shadow behind them,
- large enough to read (use Snagit's default size),
- connected to any red arrows also used in the step.
For more complex screenshots containing multiple steps, place steps in an ordered list above the image, numbered correspondingly and tabbed in once.
Red Outlines
When discussing a specific portion of a window, a window inside of the screenshot, or button press actions, use a red outline that is 2px wide around the area/button to highlight it.
"Next" and "Close" button press actions should also be emphasized by enclosing them in a red rectangle.
The red outlines should:
- be red,
- be 2px in thickness,
- be surrounding the button,
- have a middle-centered shadow behind them.
Limit these outlines to 3 per screenshot for clarity.
When to use red outlines:
- To highlight click action areas on the screen if they are hard to see (you can use both an arrow and an outline):
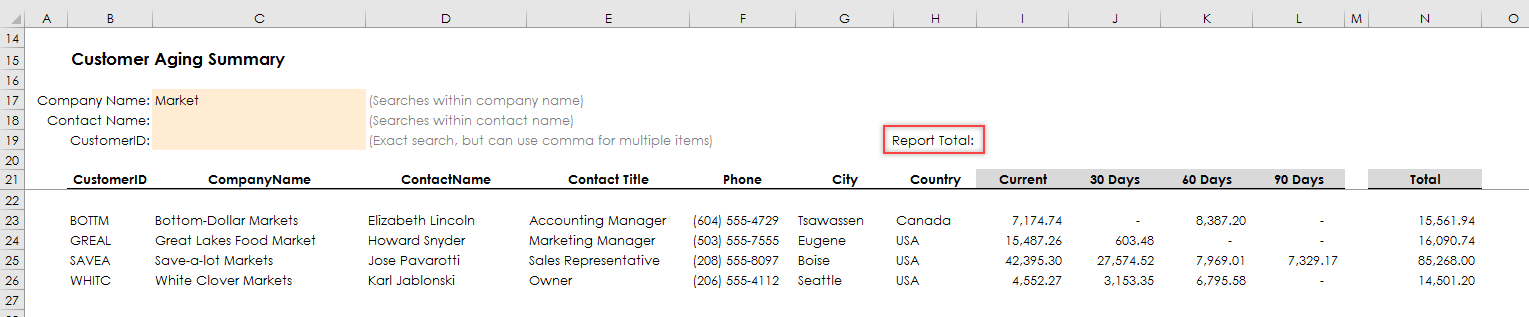
- To emphasize a portion of within the screenshot:
- To highlight “Next”, “Close” and “Ok” buttons (do not use an arrow for this):
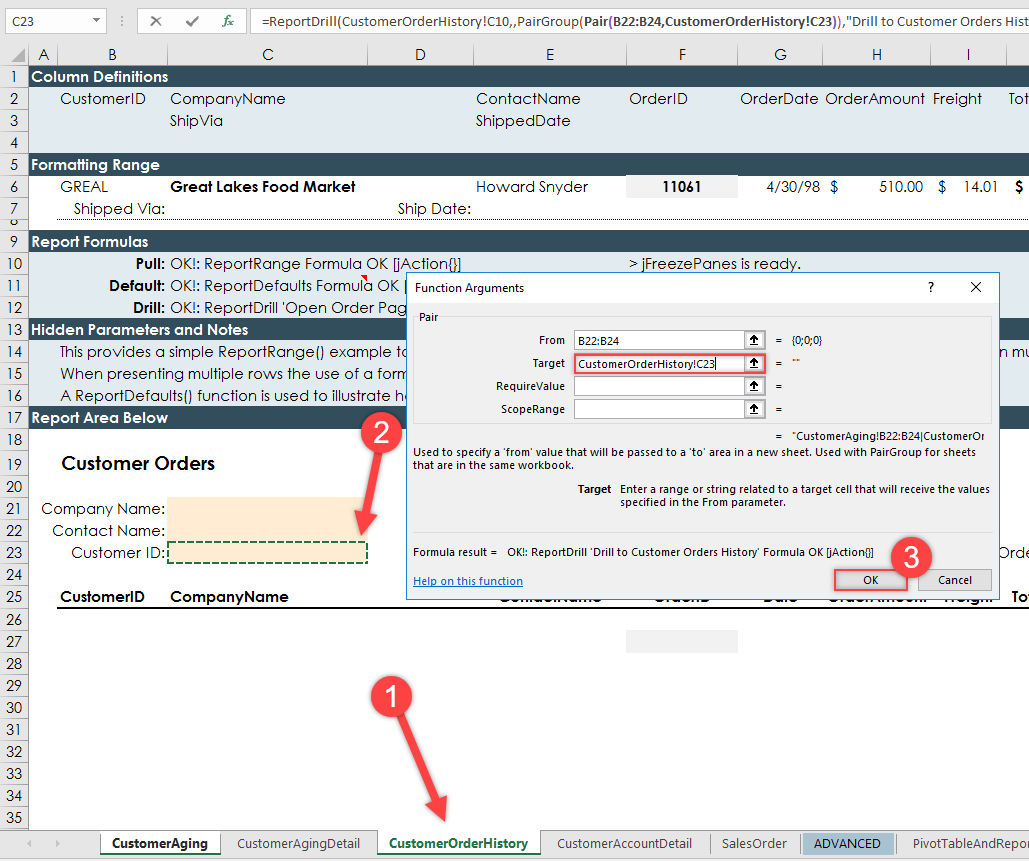
- To highlight clickable data-entry (capture) fields (use after a click action indicated by an arrow, if a data entry field comes up) (do not use both an arrow and a red border for this):
Complex Steps
For complex screenshots, include more thorough text narration in the documentation.
If a procedure is extremely involved, use a GIF.

If a screenshot has multiple images, be sure to use an ordered list of steps within it.
Popup Windows in Screenshots
When screen capturing windows that contain popups, make sure the popup appears distinct from the page containing it. To do this, allow the popup to slightly overlap other content in the image. Do not line it up with any other lines on the page. Unless a screenshot of just the pop up is needed (for a special circumstance), make sure to take screenshots of popups with the windows in which they appear; it is important to show all images with as much context as possible.
Ripped Border
If an image is to appear truncated, manually add a "ripped" black border.

Screenshots of Excel Content
For screenshots of Excel content:
- Include the Row and Column definitions in the spreadsheet to provide context, when appropriate.
- Include the Interject menu ribbon when it is being used. If the step(s) depicted in the screenshot does not use the Interject menu ribbon, do not include it in the screenshot (to save space).
- Make sure that no personal or confidential data is visible on the screen when taking screenshots.
- With the exception of login boxes, highlight all boxes from clicks to data entry (use 2px red border).
- Remove the cursor from the page when the screen is being captured, unless the cursor is needed.
Screenshots Size
Ensure the screenshots are big enough to be displayed properly. In most cases, the original screen capture size will suffice. However, be sure to check if the image is displayed properly and easily read. In addition, if you click on the image in the documentation page after the website is built, it should zoom in enough to easily read the details.
Spacing Surrounding Screenshots
When including a screenshot in the markdown file, be sure to contain a space before the image and follow the image with a <br> and another space.
...content...
<br>
...content...
Uploading and Saving Screenshots to the Documentation Site
Generally, upload your screenshot images to be the exact size as the original you had taken. Smaller images, such as in-window popups, should be 360px wide, unless an otherwise more appropriate size is needed.
Name your screenshots appropriately to describe the content of the image. For example, PullDataClick or SaveDataClick. PNG images are preferred but JPG works as well.
When saving screenshots, place them in the following directory:
/images/[DirectoryToYourPageFolder]
If a folder for your page does not exist, please add one and place all images in that folder. Every page should have its own image folder. Do not combine pages.
Standards and Formatting
Wherever possible, maintain the same formatting standards and usage as used in other pages. You can inspect the pages for examples.
Jekyll Front Matter
The Jekyll front matter is a list of meta data at the top of the MD file. It is important that this front matter is accurate, complete, and formatted correctly.
The following are the entries and their descriptions for the front matter:
---
title: Name of Page
filename: The filename
layout: custom (only use custom)
keywords: Keywords that describe the page content
headings: The headings in the page
links: The links referenced in the page (both internal and external)
image_dir: The name of the image directory for this page
images: A nested list of images with their description (see next section below)
description: A short description (typically the first paragraph in the overview)
---
* * *
The images entry for the front matter contain a nested json list of images with keys that describe the content of the image:
- file: Name of the image file (without the extension)
- type: The type of file (e.g. png or jpg or gif)
- site: The site origin of the image (e.g. Add-in, Excel, SSMS, Portal, Windows)
- cat: The main category of the image (e.g. pull data, save data, report library)
- sub: The subcategory of the image (e.g. more details of the category of the image)
- report: If a report title, Excel tab, or file is displayed or referenced list the name here
- ribbon: If simple or advanced ribbon is shown in the image
- config: If the Interject configuration area is shown in the image
Blank entries are an empty string ("").
Here is an example of a images entry:
images: [
	{file: "NewDataPortal", type: "png", site: "Portal", cat: "Data Portals", sub: "", report: "", ribbon: "", config: ""},
	{file: "DataPortalDetails", type: "png", site: "Portal", cat: "Data Portals", sub: "Details", report: "", ribbon: "", config: ""},
	{file: "AddSystemParameter", type: "png", site: "Portal", cat: "Data Portals", sub: "Details", report: "", ribbon: "", config: ""},
	{file: "ChangeReportSaveFunction", type: "png", site: "Add-in", cat: "Report", sub: "", report: "Customer Aging Summary", ribbon: "", config: ""},
	{file: "SPCurrentDate", type: "png", site: "SSMS", cat: "Code", sub: "", report: "", ribbon: "", config: ""}
	]
For more specific examples of what to put in the cat and sub entries, see existing pages.
Headings
Most pages should have the "Overview" heading as a h2 (##). Subsequent headings should be marked as h3 (###) or h4 (####).
Headings should be Title Case (following APA standards).
Headings should not be in bold as they are formatted already with their heading formatting.
Include one line space before and after all headings.
Table of Contents
TOC entries should always have a default link. For example, if the parent category group does not have a landing page, it should link to the first sub category page.
Grammar/Spelling
Ensure all extra lines are removed.
Ensure all extra spaces are removed.
Ensure spelling is correct.
Ensure consistency is maintained for the spelling and capitalization of certain words (e.g. Data Portal, Walkthrough).
Referencing Buttons and Text
Whenever a button or menu item is referenced, mark the item as bold (**). Whenever instruction to enter text is given, the text in question should be bold.
Whenever quotation marks are to be entered in the instructions, they should be escaped. For example:
Select cell E4 and enter **=ReportRange(\"NorthwindCustomers\")**
Lists
Lists should be explicitly numbered to ensure it displays correctly across multiple platforms. For example:
1. Item 1
2. Item 2
3. Item 3
Not:
1. Item 1
1. Item 2
1. Item 3
Tables
Tables should follow Jekyll/Markdown format for consistency wherever possible:
| Item | Description |
|-----|-----|
| Item1 | This is the description to Item1 |
| Item2 | This is the description to Item2 |
| Item3 | This is the description to Item3 |
Tables do not need to have extra spaces as Jekyll will format the table and delete extra spaces. Only use extra spaces where it is necessary to visualize the table in the markdown file.
When this is not possible (e.g. needing html formatting in the table), standard html table format should reflect the same standard table appearance for consistency.
Links
Include links to other pages as necessary for expanded learning about the concept or terms being used.
Ensure all links work. Links to external websites should be followed by:
{:target="_blank"}{:rel="noopener noreferrer"}
Code Blocks
Code blocks are preceded by ``` to mark them as code. Generally, code should be be separated from the main content of the page.
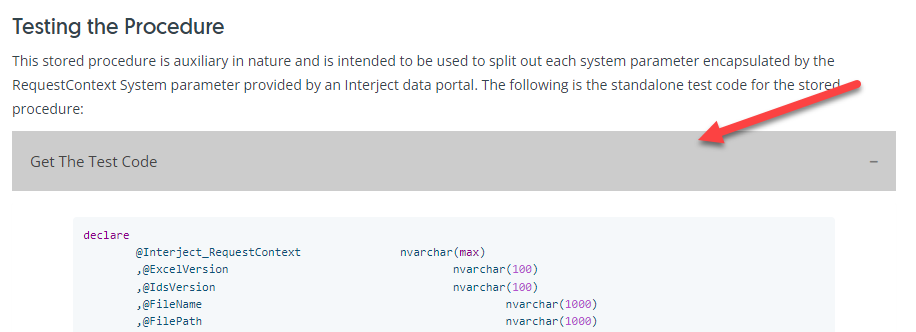
When the code is significant in size, wrap it in a collapsible button:
HTML/CSS Classes
Collapsible Button
A collapsible button is useful for collapsing a large amount of text or table to improve readability. This is useful for code blocks:
Wrap a large amount of code in this class:
<button class="collapsible">Text to display on the button</button>
<div markdown="1" class="panel">
    ```
    <code>
    ```
</div>
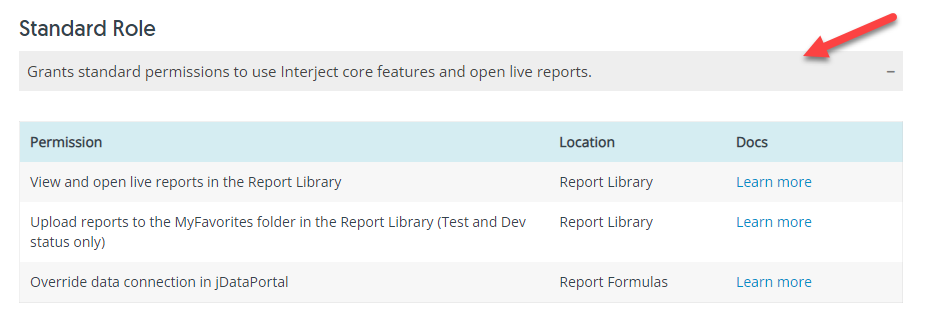
Collapsible Button (Expanded)
This class is just like a collapsible button except that it is expanded by default:
The code for this class:
<button class="collapsible-expanded">Text to display on the button</button>
<div markdown="1" class="panel-expanded">

</div>
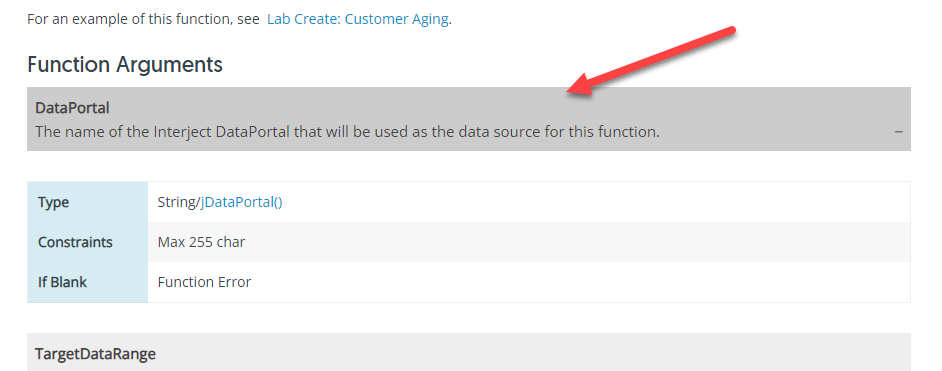
Parameter Button
This is similar to the Collapsible button but is a different class used specifically for the parameters of the Interject functions:
The code:
<button class="collapsible-parameter">**Button Title**<br>The text to display</button>
<div markdown="1" class="panel-parameter">

</div>
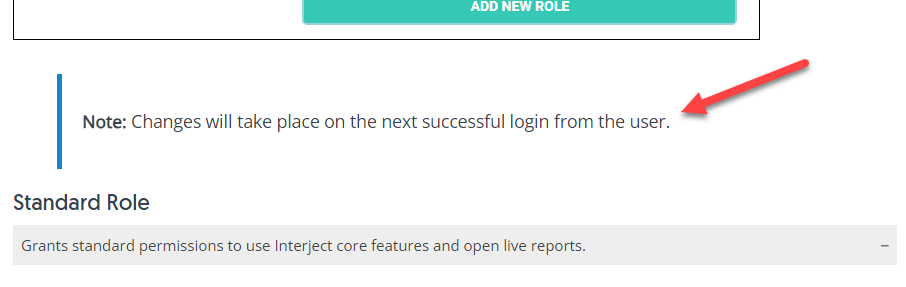
Highlight Note
Highlight notes are used to highlight special parenthetical messages but with important significance:
The code for the highlightnote:
<blockquote class=highlightnote>
<br><b>Note:</b> Text to display<br><br>
</blockquote>
Lab Note
A lab note is used for key information to direct the user who is following the lab guide:
The code:
<blockquote class=lab_info>
 Text to display
</blockquote>
Python Suite
In the _python folder is a suite for various update, extraction, and pytest scripts:
- _python/extraction: Scripts for extracting meta data from the front matter
- _python/formulas: Scripts for extracting Interject formula information
- _python/front_matter: Scripts for updating the front matter in doc pages
- _python/tests: Pytest to verify all links in the doc site
All extracted metadata will be found in the _metadata folder.
Note: Be sure to commit your changes before running scripts in the event you need to revert back.
Pytests
The Pytest can be run on the site to validate the links (images, internal links, headings, toc paths, and URLs).
Note: The pytest will use the front_matter.yaml in the _metadata folder. If not found, it will extract the front matter from all doc files. Before running the pytest, be sure this file is updated.
From the gointerject.github.io/python folder, run the following:
python pytest
Results will be printed and logs will appear in the _python/logs folder.
Post-Commit Procedures
When you are done committing your changes, you can run the following sequence to update all the front matter for all doc pages, extract the metadata, and run the pytest:
cd gointerject.github.io
python _python/front_matter/update_doc_pages.py
python _python/extraction/extract_all.py
cd _python
pytest
Note: Be sure to update the variables in the _python\config.py file before running scripts.